Getting Started with Broker API
This guide is going to help you set everything up in a sandbox environment to get you up and running with Broker API.
The sandbox environment acts as a parallel environment where you can test our APIs safely without sending any real trades to the market. All prices, and execution times (i.e. market hours) hold true in sandbox and production.
You can either follow the steps below to test specific calls within the broker dashboard or access the Postman collection to view and test all possible requests in one place.
Postman Collection
To get started with the Broker API Postman Collection you can either access the Alpaca Workspace on Postman to fork the collection or import the file below directly to your own workspace.
Fork Broker API Collection on Postman
Refer to this tutorial to learn how to fork the collection and sample environment and get started with making calls right away. We recommend following this method so your collection stays up to date with the changes we make to the API.
Import Broker API Collection
- Download the Broker API API Collection
- Import the file into Postman (File -> Import..)
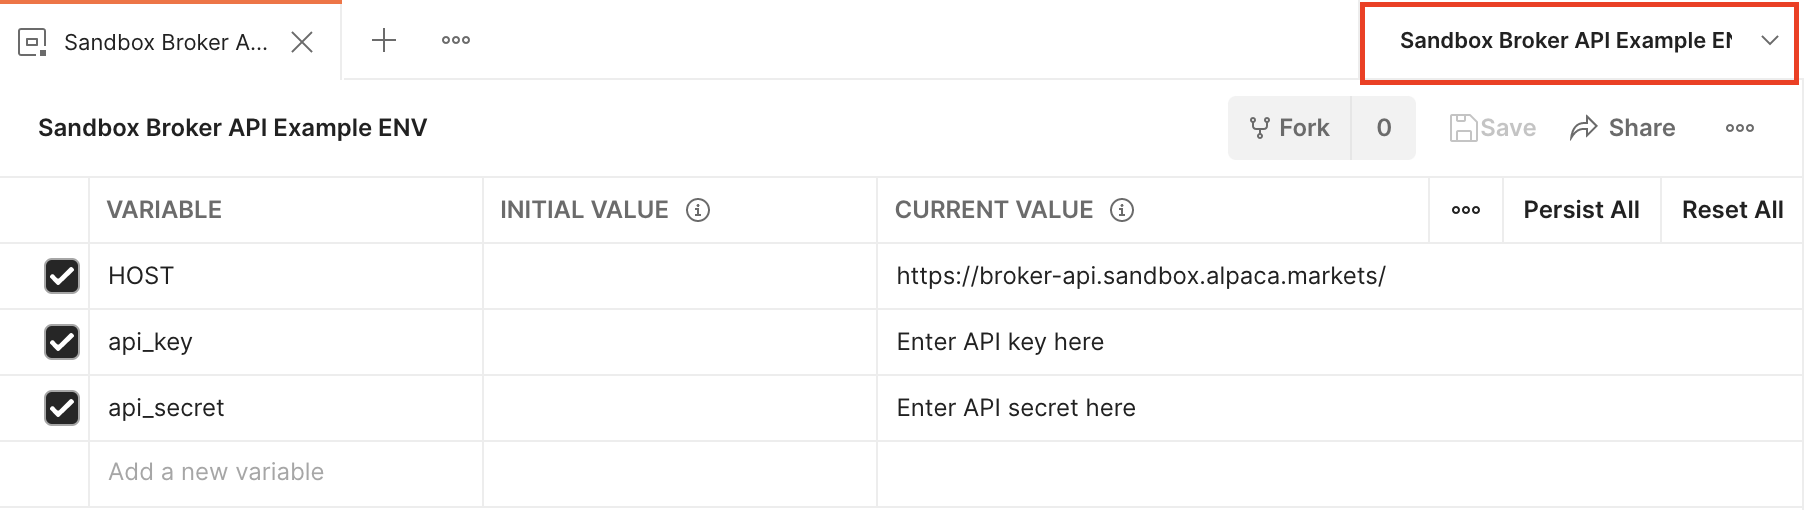
- Create a Postman environment with the following variables. Be sure to select the environment in the upper right hand corner like pictured below.
- Send one of the defined HTTP requests while the created environment is selected.
Testing on Broker Dashboard (Brokerdash)
0. Setting up Broker API on Brokerdash
API Keys
When you sign up for an account at Alpaca you will receive an API_KEY and API_SECRET, please make sure you store those somewhere safe.
Broker API must authenticate using HTTP Basic authentication. Use your correspondent API_KEY and API_SECRET as the username and password. The format is key:secret. Encode the string with base-64 encoding, and you can pass it as an authentication header.
Live Environment
We have provided in our dashboard an API tool that uses your API key credentials to send requests and receive responses straight from your browser.
Simply navigate to API/Devs > Live Testing and try out our APIs.
Making Your First Request
At this point we can assume that you haven’t created any accounts yet, but one of the first API calls you can make is GET /v1/assets, which doesn’t require a request body and will give you all the assets available at Alpaca.
The response would contain an array of assets, with the first one being Agilent Technologies Inc. as of 2021-05-17
{
	"id": "7595a8d2-68a6-46d7-910c-6b1958491f5c",
	"class": "us_equity",
	"exchange": "NYSE",
	"symbol": "A",
	"name": "Agilent Technologies Inc.",
	"status": "active",
	"tradable": true,
	"marginable": true,
	"shortable": true,
	"easy_to_borrow": true,
	"fractionable": true
},
1. Create an Account
One of the first things you would need to do using Broker API is to create an account for your end user. Depending on the type of setup you have with Alpaca (Fully-Disclosed, Omnibus or RIA) the requirements might differ.
Below is a sample request to create an account for a Fully-Disclosed setup:
{
  "contact": {
    "email_address": "[email protected]",
    "phone_number": "555-666-7788",
    "street_address": ["20 N San Mateo Dr"],
    "city": "San Mateo",
    "state": "CA",
    "postal_code": "94401",
    "country": "USA"
  },
  "identity": {
    "given_name": "John",
    "family_name": "Doe",
    "date_of_birth": "1990-01-01",
    "country_of_citizenship": "USA",
    "country_of_birth": "USA",
    "country_of_tax_residence": "USA",
    "funding_source": ["employment_income"]
  },
  "disclosures": {
    "is_control_person": false,
    "is_affiliated_exchange_or_finra": false,
    "is_politically_exposed": false,
    "immediate_family_exposed": false
  },
  "agreements": [
    {
      "agreement": "margin_agreement",
      "signed_at": "2020-09-11T18:09:33Z",
      "ip_address": "185.13.21.99"
    },
    {
      "agreement": "account_agreement",
      "signed_at": "2020-09-11T18:13:44Z",
      "ip_address": "185.13.21.99"
    },
    {
      "agreement": "customer_agreement",
      "signed_at": "2020-09-11T18:13:44Z",
      "ip_address": "185.13.21.99"
    }
  ],
  "documents": [
    {
      "document_type": "cip_result",
      "content": "VGhlcmUgYXJlIG5vIHdpbGQgYWxwYWNhcy4=",
      "mime_type": "application/pdf"
    },
    {
      "document_type": "identity_verification",
      "document_sub_type": "passport",
      "content": "QWxwYWNhcyBjYW5ub3QgbGl2ZSBhbG9uZS4=",
      "mime_type": "image/jpeg"
    }
  ],
  "trusted_contact": {
    "given_name": "Jane",
    "family_name": "Doe",
    "email_address": "[email protected]"
  }
}
If successful, the reponse would be
{
  "id": "b9b19618-22dd-4e80-8432-fc9e1ba0b27d",
  "account_number": "935142145",
  "status": "APPROVED",
  "currency": "USD",
  "last_equity": "0",
  "created_at": "2021-05-17T09:53:17.588248Z"
}
2. Fund an Account via ACH
Creating an ACH Relationship
In order to virtually fund an account via ACH we must first establish the ACH Relationship with the account.
We will be using the following endpoint POST /v1/accounts/{account_id}/ach_relationships replacing the account_id with b9b19618-22dd-4e80-8432-fc9e1ba0b27d
{
  "account_owner_name": "Awesome Alpaca",
  "bank_account_type": "CHECKING",
  "bank_account_number": "32131231abc",
  "bank_routing_number": "121000358",
  "nickname": "Bank of America Checking"
}
Please make sure that the formatting for bank_account_number and bank_routing_number are in the correct format.
If successful you will receive an ach_relationship object like this:
{
  "id": "c9b420e0-ae4e-4f39-bcbf-649b407c2129",
  "account_id": "b9b19618-22dd-4e80-8432-fc9e1ba0b27d",
  "created_at": "2021-05-17T09:54:58.114433723Z",
  "updated_at": "2021-05-17T09:54:58.114433723Z",
  "status": "QUEUED",
  "account_owner_name": "Awesome Alpaca",
  "bank_account_type": "CHECKING",
  "bank_account_number": "32131231abc",
  "bank_routing_number": "121000358",
  "nickname": "Bank of America Checking"
}
Initially you will receive a status = QUEUED.
However, if you make a GET/v1/accounts/{account_id}/ach_relationships, after ~1 minute you should see status = APPROVED.
Making a Virtual ACH Transfer
Now that you have an existing ACH relationship between the account and their bank, you can fund the account via ACH using the following endpoint POST/v1/accounts/{account_id}/transfers using the relationship_id we got in the response of the previous section.
{
  "transfer_type": "ach",
  "relationship_id": "c9b420e0-ae4e-4f39-bcbf-649b407c2129",
  "amount": "1234.567",
  "direction": "INCOMING"
}
The response you should get would look like this.
{
  "id": "750d8323-19f6-47d5-8e9a-a34ed4a6f2d2",
  "relationship_id": "c9b420e0-ae4e-4f39-bcbf-649b407c2129",
  "account_id": "b9b19618-22dd-4e80-8432-fc9e1ba0b27d",
  "type": "ach",
  "status": "QUEUED",
  "amount": "1234.567",
  "direction": "INCOMING",
  "created_at": "2021-05-17T09:56:05.445592162Z",
  "updated_at": "2021-05-17T09:56:05.445592162Z",
  "expires_at": "2021-05-24T09:56:05.445531104Z"
}
After around 10-30 minutes (to simulate ACH delay) the transfer should reflect on the user’s balance via a cash deposit activity (CSD) viewed via this endpoint GET v1/accounts/activities/CSD\?account_id\={account_id}
3. Journaling Between Accounts
In addition to transfer and funding via ACH and wire, we have enabled organizations to directly fund their Firm Accounts and then journal from those to user’s accounts in order to simulate near instantaneous funding.
Introducing the Firm Account
Each team will come with a firm account in sandbox that is pre-funded for $50,000. You can use this account to simulate funding to your users or use it for rewards programs to fuel your app’s growth.
To illustrate our example, the Sweep account for this sandbox account looks like this
{
  "id": "8f8c8cee-2591-4f83-be12-82c659b5e748",
  "account_number": "927721227",
  "status": "ACTIVE",
  "currency": "USD",
  "last_equity": "45064.36",
  "created_at": "2021-03-03T17:50:06.568149Z"
}
Journaling Cash
In the case of a signup reward, or simply attempting to simulate instant funding, journaling funds between your firm balance with Alpaca and the end user’s brokerage account is the best way.
You can simply pass in a request with entry_type =JNLC and choose the amount you want to journal to the user.
4. Passing an Order
The most common use case of Alpaca Broker API is to allow your end users to trade on the stock market. To do so simply pass in to POST /v1/trading/accounts/{account_id}/orders and again replacing the account_id with b9b19618-22dd-4e80-8432-fc9e1ba0b27d
{
  "symbol": "AAPL",
  "qty": 0.42,
  "side": "buy",
  "type": "market",
  "time_in_force": "day"
}
Whatever the response from Alpaca would be (denoted by the status) you should receive an Order model in the response looking like this
{
  "id": "4c6cbac4-e17a-4373-b012-d446b20f9982",
  "client_order_id": "5a5e2660-88a7-410c-92c9-ab0c942df70b",
  "created_at": "2021-05-17T11:27:18.499336Z",
  "updated_at": "2021-05-17T11:27:18.499336Z",
  "submitted_at": "2021-05-17T11:27:18.488546Z",
  "filled_at": null,
  "expired_at": null,
  "canceled_at": null,
  "failed_at": null,
  "replaced_at": null,
  "replaced_by": null,
  "replaces": null,
  "asset_id": "b0b6dd9d-8b9b-48a9-ba46-b9d54906e415",
  "symbol": "AAPL",
  "asset_class": "us_equity",
  "notional": null,
  "qty": "0.42",
  "filled_qty": "0",
  "filled_avg_price": null,
  "order_class": "",
  "order_type": "market",
  "type": "market",
  "side": "buy",
  "time_in_force": "day",
  "limit_price": null,
  "stop_price": null,
  "status": "accepted",
  "extended_hours": false,
  "legs": null,
  "trail_percent": null,
  "trail_price": null,
  "hwm": null,
  "commission": "0"
}
5. Events (SSE)
You can always listen to any event changes to accounts, journals or orders via our Events SSE.
An example for a journal update via this endpoint GET/v1/events/journal/updates where it shows all the different stages the journal id = 2f144d2a-91e6-46ff-8e37-959a701cc58d is going through.
data: {"at":"2021-05-07T10:28:23.163857Z","entry_type":"JNLC","event_id":1406,"journal_id":"2f144d2a-91e6-46ff-8e37-959a701cc58d","status_from":"","status_to":"queued"}

data: {"at":"2021-05-07T10:28:23.468461Z","entry_type":"JNLC","event_id":1407,"journal_id":"2f144d2a-91e6-46ff-8e37-959a701cc58d","status_from":"queued","status_to":"pending"}

data: {"at":"2021-05-07T10:28:23.522047Z","entry_type":"JNLC","event_id":1408,"journal_id":"2f144d2a-91e6-46ff-8e37-959a701cc58d","status_from":"pending","status_to":"executed"}
You are now ready to explore more of Broker API!
Have a look at our API References and feel free to contact us anytime through Intercom on your Broker Dashboard!
Request ID
All Broker API endpoint provides a unique identifier of the API call in the response header with X-Request-ID key, the Request ID helps us to identify the call chain in our system.
Make sure you provide the Request ID in all support requests that you created, it could help us to solve the issue as soon as possible. Request ID can't be queried in other endpoints, that is why we suggest to persist the recent Request IDs.
$ curl -v https://broker-api.sandbox.alpaca.markets/v1/accounts
...
> GET /v1/accounts HTTP/1.1
> Host: broker-api.sandbox.alpaca.markets
> User-Agent: curl/7.88.1
> Accept: */*
>
< HTTP/1.1 403 Forbidden
< Date: Fri, 25 Aug 2023 09:10:03 GMT
< Content-Type: application/json
< Content-Length: 26
< Connection: keep-alive
< X-Request-ID: 65ddd35ed1b3433dbf29d11f6d932c88
<
...
Updated 4 months ago
Now Market Data supports Broker API
Alpaca’s backoffice handling of Account Opening
Alpaca’s Daily Processes