Step-by-Step to Build a Stock Trading Bot
Step-by-step to build a simple moving average cross strategy in algorithmic trading. This uses a few different trading symbols to give a small sample of the how it might fair in live trading.

Here is a sample code for simple moving average crossover strategy to be used in this article.
Visual Strategy Development
Visual strategy creation is an important part of quick and efficient development, as it allows you to easily debug and adjust ideas by looking at how signals develop and change with shifts in the market.
I find Python to be a good language for this type of data-science, as the syntax is easy to understand and there are a wide range of tools and libraries to help you in your development. On top of this, the Alpaca Python API gives us an easy way to integrate market data without having to implement a new API wrapper.
For data processing and plotting, I recommend using TA-Lib and Matplotlib. Ta-Lib provides a nice library to calculate common market indicators, so that you don’t have to reimplement them yourself; while matplotlib is a simple yet powerful plotting tool which will serve you well for all types of data visualization.

The script adds a simple moving average cross strategy against a few different trading symbols to give a small sample of the how it might fair in live trading. This allows for a first sanity check for a new strategy’s signals. Once a strategy has passed visual inspection you can run it through a backtesting tool.
You may even wish to add visual markers to each simulated trade and, for a move advanced strategy, the indicators the signal was derived from. This can make it even easier to analyze the weaknesses of a signal set so that you can adjust its parameters.
import matplotlib.pyplot as plt
from datetime import datetime
import numpy as np
import talib
import alpaca_trade_api as tradeapi

api = tradeapi.REST(key_id=<your key id>,secret_key=<your secret key>)

barTimeframe = "1H" # 1Min, 5Min, 15Min, 1H, 1D
assetsToDownload = ["SPY","MSFT","AAPL","NFLX"]
startDate = "2017-01-01T00:00:00.000Z" # Start date for the market data in ISO8601 format

# Tracks position in list of symbols to download
iteratorPos = 0
assetListLen = len(assetsToDownload)

while iteratorPos < assetListLen:
	symbol = assetsToDownload[iteratorPos]

	returned_data = api.get_bars(symbol,barTimeframe,start_dt=startDate).bars

	timeList = []
	openList = []
	highList = []
	lowList = []
	closeList = []
	volumeList = []

	# Reads, formats and stores the new bars
	for bar in returned_data:
		timeList.append(datetime.strptime(bar.time,'%Y-%m-%dT%H:%M:%SZ'))
		openList.append(bar.open)
		highList.append(bar.high)
		lowList.append(bar.low)
		closeList.append(bar.close)
		volumeList.append(bar.volume)

	# Processes all data into numpy arrays for use by talib
	timeList = np.array(timeList)
	openList = np.array(openList,dtype=np.float64)
	highList = np.array(highList,dtype=np.float64)
	lowList = np.array(lowList,dtype=np.float64)
	closeList = np.array(closeList,dtype=np.float64)
	volumeList = np.array(volumeList,dtype=np.float64)

	# Calculated trading indicators
	SMA20 = talib.SMA(closeList,20)
	SMA50 = talib.SMA(closeList,50)


	# Defines the plot for each trading symbol
	f, ax = plt.subplots()
	f.suptitle(symbol)

	# Plots market data and indicators
	ax.plot(timeList,closeList,label=symbol,color="black")
	ax.plot(timeList,SMA20,label="SMA20",color="green")
	ax.plot(timeList,SMA50,label="SMA50",color="red")

	# Fills the green region if SMA20 > SMA50 and red if SMA20 < SMA50
	ax.fill_between(timeList, SMA50, SMA20, where=SMA20 >= SMA50, facecolor='green', alpha=0.5, interpolate=True)
	ax.fill_between(timeList, SMA50, SMA20, where=SMA20 <= SMA50, facecolor='red', alpha=0.5, interpolate=True)

	# Adds the legend to the right of the chart
	ax.legend(loc='center left', bbox_to_anchor=(1.0,0.5))

	iteratorPos += 1

plt.show()
Simple Trading Bot
Once you’ve moved past the backtesting stage, you’ll need a simple trading framework to integrate your strategies for live testing. This can then be run on a paper trading account to test the signals against a live data feed.
This is an important step in development, as it tests whether the strategy has been over-fit to its dataset. For example, a strategy could easily be tuned to perfectly trade a specific symbol over a backtesting period. However, this is unlikely to generalize well to other markets or different time periods — leading to ineffective signals and losses.
As such, you’ll want to a simple way to test your strategies in a staging environment, before committing any money to them with a real trading account. This is both for testing the strategy and the implementation, as a small bug in your code could be enough to wipe out an account, if left unchecked.
Here’s another example snippet of a trading bot which implements the moving average cross strategy (full script at end of this section).
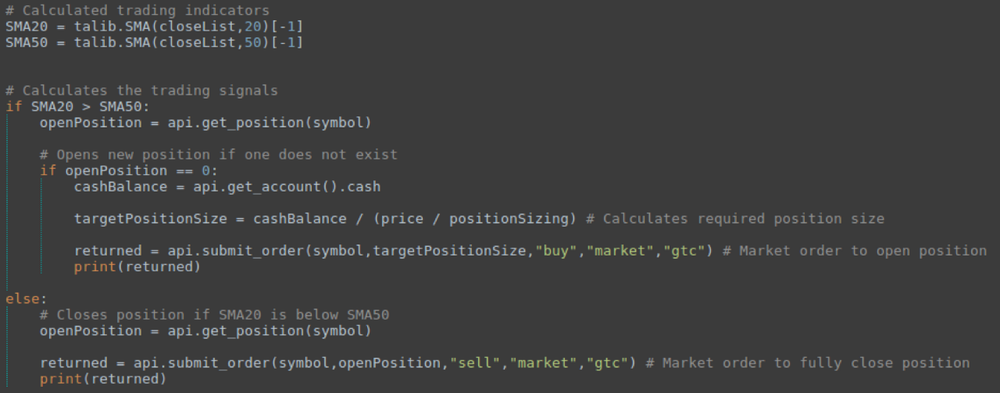
To make this into a full trading bot you could choose to either add a timed loop to the code itself or have the whole script run on a periodic schedule. The latter is often a better choice, as an exception causing an unexpected crash would completely stop the trading bot if it were a self contained loop. Where as, a scheduled task would have no such issue, as each polling step is a separate instance of the script.
On top of this, you’ll probably want to implement a logging system, so that you can easily monitor the bot and identify any bugs as it runs. This could be achieved by adding a function to write a text file with any relevant information at the end of each process.
Once you have a working strategy, the Alpaca API should make it easy to expand your trading bot into a full production system, allowing you to start trading quickly.
from datetime import datetime
import numpy as np
import talib
import alpaca_trade_api as tradeapi

api = tradeapi.REST(key_id=<your key id>,secret_key=<your secret key>)

barTimeframe = "1H" # 1Min, 5Min, 15Min, 1H, 1D
assetsToTrade = ["SPY","MSFT","AAPL","NFLX"]
positionSizing = 0.25

# Tracks position in list of symbols to download
iteratorPos = 0
assetListLen = len(assetsToTrade)

while iteratorPos < assetListLen:
	symbol = assetsToTrade[iteratorPos]

	returned_data = api.get_bars(symbol,barTimeframe,limit=100).bars

	timeList = []
	openList = []
	highList = []
	lowList = []
	closeList = []
	volumeList = []

	# Reads, formats and stores the new bars
	for bar in returned_data:
		timeList.append(datetime.strptime(bar.time,'%Y-%m-%dT%H:%M:%SZ'))
		openList.append(bar.open)
		highList.append(bar.high)
		lowList.append(bar.low)
		closeList.append(bar.close)
		volumeList.append(bar.volume)

	# Processes all data into numpy arrays for use by talib
	timeList = np.array(timeList)
	openList = np.array(openList,dtype=np.float64)
	highList = np.array(highList,dtype=np.float64)
	lowList = np.array(lowList,dtype=np.float64)
	closeList = np.array(closeList,dtype=np.float64)
	volumeList = np.array(volumeList,dtype=np.float64)

	# Calculated trading indicators
	SMA20 = talib.SMA(closeList,20)[-1]
	SMA50 = talib.SMA(closeList,50)[-1]


	# Calculates the trading signals
	if SMA20 > SMA50:
		openPosition = api.get_position(symbol)

		# Opens new position if one does not exist
		if openPosition == 0:
			cashBalance = api.get_account().cash

			targetPositionSize = cashBalance / (price / positionSizing) # Calculates required position size

			returned = api.submit_order(symbol,targetPositionSize,"buy","market","gtc") # Market order to open position
			print(returned)

	else:
		# Closes position if SMA20 is below SMA50
		openPosition = api.get_position(symbol)

		returned = api.submit_order(symbol,openPosition,"sell","market","gtc") # Market order to fully close position
		print(returned)

	iteratorPos += 1
By Matthew Tweed

