VBA & Excel with Alpaca Trading API - The GET Tutorial
This tutorial will focus on GET requests, which simply ask the endpoint for some information (like current market positions for an account) of your Alpaca account by using VBA and Excel.

GET Tutorial to Get Your Account Related Information
This Part 1 tutorial will focus on GET requests, which simply ask the endpoint for some information (like current market positions for an account) of your Alpaca account by using VBA and Excel. The next one (Part 2) will focus on POST requests, which include some extra information for the API server to process (such as entering trades).
In my last article (“For Excel Persons — How to Pull Market Data with VBA”), I wrote about making HTTP requests to Alpaca’s open, public-facing API. If you don’t have an account over at Alpaca, you could still follow along and make requests and retrieve data.
Now, let’s look at making authenticated requests that are associated directly with your account. That means you’ll need to set up an account on the platform.

Setting up Your Paper Trading Account
If you don’t have an account, fortunately, the company allows anyone to sign up for a paper trading account. You do not have to commit any capital since it is not a live trading account. The paper trading account has $100,000 (as default amount and can be reset to any dollar amount) to practice trading, test strategies, and generally play around without risking real money. We’ll use the paper account for these two tutorials (the GET and the POST tutorials).
Generating Your Keys
Once you’ve signed up for a paper trading account, you should see something like this:
Key ID & Secret Key
The red rectangles should be the same for you, but your Paper Trading API Key ID (blue box) should be different. This is the key you will need when you send your requests. When you first start, you should also have a secret key available, but if you don’t you can press “Regenerate Key”, which will give you a new key and secret key.
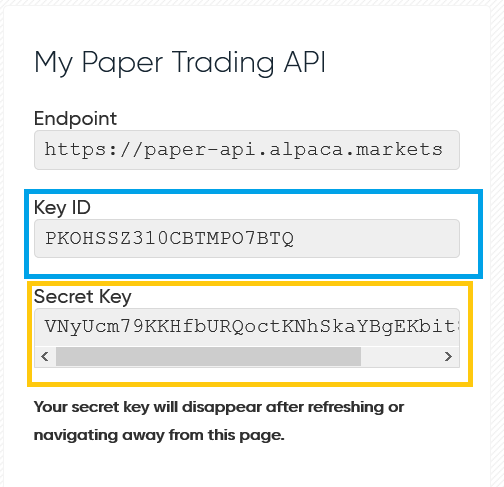
The orange box will be your secret key, which you will also need when making requests. As stated under the light orange box, Alpaca will hide your secret key from the web browser once you refresh or go to another page. This is meant to protect your account from any malicious persons who might happen to stumble upon your open browser.
Since the key will disappear, you need to record it somewhere. Mine is just stored in my VBA code modules, which is good a place as any. If it does disappear and you don’t know it, you can always generate another key. However, if any of your programs use the current key, they will break (except the open, public-facing API portion).
Now that we’ve got the key generation out of the way, we can dive into the code.
Code Skeleton
Let’s set up a code skeleton first so the outline is clear. We will use the HTTP request object we set up in the previous article. The only important part not immediately obvious from the code skeleton is that you must enable the Microsoft XML, v6.0 reference in the VBA editor. Otherwise, using the object is relatively straightforward.
The skeleton should look like this:
Sub authenticated_test()

Dim req As MSXML2.ServerXMLHTTP60

Dim key_id, key_header_name, secret_key, secret_header_name, liveURL, paperURL As String

Set req = New  MSXML2.ServerXMLHTTP60

key_id = "PKOHSSZ310CBTMPO7BTQ"

key_header_name = "APCA-API-KEY-ID"

secret_key = "VNyUcm79KKHfbURQoctKNhSkaYBgEKbit8aI0Q9B"

secret_header_name = "APCA-API-SECRET-KEY"

liveURL = "https:// api.alpaca.markets"

paperURL = "https://paper-api.alpaca.markets"

req.Open "GET", paperURL, False

req.setRequestHeader key_header_name, key_id

req.setRequestHeader secret_header_name, secret_key

req.send

End Sub
If you run this code (with your keys), you will get a 404 Error Response, since your request is hitting the API endpoint’s stem (`paper-api.alpaca.markets`) rather than the actual endpoint (the stem plus some other information). However, all the important information is here:
- the ID key, which tells Alpaca who you are
- the secret key, which tells Alpaca you are who you say you are
- the header names, which tell Alpaca which key is which (ID or secret)
- and the API endpoint stem, to which we will append the correct endpoints in later sections
Accessing Account Information
The first and easiest GET request to make is asking for account information. To access the endpoint, you should append /v1/account to the API stem URL we had earlier. Thus the req.Open line should read as such:
req.Open “"GET”, paperURL & “/v1/account”, False
which will hit the Accounts endpoint and send back a long string in JSON format. The JSON should look something like this:
{“id”:”7cccc70a-a60c-1cc5–89d3–0a0971ef54c8",”status”:”ACTIVE”,”currency”:”USD”,”buying_power”:”100000",”cash”:”100000",”cash_withdrawable”:”0",”portfolio_value”:”100000",”pattern_day_trader”:false,”trading_blocked”:false,”transfers_blocked”:false,”account_blocked”:false,”created_at”:”2018–12–04T07:15:43.603069Z”,”trade_suspended_by_user”:false}
And you can view basic info about the account. If you happen to have more than one account, this is useful for grabbing the ID and checking you’re using the correct ID key. You don’t want to place trades in the wrong place.
As mentioned in the previous article, there is no built-in JSON parser for VBA. There are a few good open-source options out on the internet, and I suggest finding one you like to parse this data. Trying to do it yourself is rather painstaking, and I would not recommend it.
Retrieving Assets Available on Alpaca
Not all assets are going to be available to trade through Alpaca. This is particularly true of OTC assets, but it is a good idea to check the asset list every time you make a trade. Once automation comes into play, you might not be directly entering the trades, so error-trapping is essential.
To check that a particular asset is available, simply use the /v1/assets/ endpoint and append the symbol. Your URL string should look like this:
https://paper-api.alpaca.markets/v1/assets/ where is the actual symbol (without the curly braces).
Let’s say you want to trade Apple stock, then you should send this off as your GET request:
https://paper-api.alpaca.marets/v1/assets/AAPL
You will get this string in response:
{“id”:”b0b6dd9d-8b9b-48a9-ba46-b9d54906e415",”asset_class”:”us_equity”,”exchange”:”NASDAQ”,”symbol”:”AAPL”,”status”:”active”,”tradable”:true}with the class, the exchange, and, importantly, the status and the tradable flags. If the tradable flag is false, unfortunately you will not be able to trade it. It would be a good idea to check this flag from the GET request before you move on to making POST requests to actually place a trade.
If you want to trade Samsung, for example, which is not listed on any US exchange (even as an American Depository Receipt (ADR)), you will get an error:
{“code”:40410000,”message”:”asset not found for SSNLF”}
And the status code
will be 404.
Retrieving Positions
To retrieve your current positions, you also use GET requests. Simply hit the /v1/positions endpoint to get all your current positions, and the /v1/positions/ endpoint with the symbol if you just want to check your market position of a particular asset. You’ll get a response string with some decent information, including calculated details like average entry price and your unrealized gains/losses. Of course you’ll get simple factual information, too, like the number of shares, the price, the market value, and which exchange the asset is traded on.
Retrieving Orders
Similarly, you can query your current orders by using GETs on the /v1/orders endpoint. If you have a particular order in mind, you can append the order ID to the endpoint to get information on that particular order. (You can get the order ID from the POST request or from the list of orders spit out from the regular orders endpoint).
Thus, to check the details on order 2db78c3d-7c76–42ce-ba55-c870f2183606, you would hit /v1/orders/2db78c3d-7c76–42ce-ba55-c870f2183606. The response string will include data like the fill date (if it was filled), the quantity, the side (buy or sell), and stops, limits, and time in force options.
order_ID = “2db78c3d-7c76-42ce-ba55-c870f2183606”
req.Open “GET”, paperURL  & “/v1/orders/” & order_ID
Compare the order responses for the order we just queried, before and after execution:
BEFORE:
{“id”:”2db78c3d-7c76–42ce-ba55-c870f2183606",”client_order_id”:”b0751e40-dbde-4487–9129-da459644cec1",”created_at”:”2019–01–31T11:48:19.42461Z”,”updated_at”:”2019–01–31T11:48:19.448971Z”,”submitted_at”:”2019–01–31T11:48:19.424567Z”,”filled_at”:null,”expired_at”:null,”canceled_at”:null,”failed_at”:null,”asset_id”:”b6d1aa75–5c9c-4353-a305–9e2caa1925ab”,”symbol”:”MSFT”,”asset_class”:”us_equity”,”qty”:”1",”filled_qty”:”0",”filled_avg_price”:null,”order_type”:”market”,”type”:”market”,”side”:”buy”,”time_in_force”:”day”,”limit_price”:null,”stop_price”:null,”status”:”new”}AFTER
{“id”:”2db78c3d-7c76–42ce-ba55-c870f2183606",”client_order_id”:”b0751e40-dbde-4487–9129-da459644cec1",”created_at”:”2019–01–31T11:48:19.42461Z”,”updated_at”:”2019–01–31T14:30:05.319068Z”,”submitted_at”:”2019–01–31T11:48:19.424567Z”,”filled_at”:2019–01–31T14:30:05.277Z,”expired_at”:null,”canceled_at”:null,”failed_at”:null,”asset_id”:”b6d1aa75–5c9c-4353-a305–9e2caa1925ab”,”symbol”:”MSFT”,”asset_class”:”us_equity”,”qty”:”1",”filled_qty”:”1",”filled_avg_price”:103.87,”order_type”:”market”,”type”:”market”,”side”:”buy”,”time_in_force”:”day”,”limit_price”:null,”stop_price”:null,”status”:””filled””}
Can you spot the differences? Did you guess those differences from the BEFORE string without even looking at the AFTER string? Note the nulls in the response before filling and how they change after fulfillment.
An Issue with Caching
For GET requests, you may have seen other tutorials using MSXML2.XMLHTTP60 instead of MSXML2.ServerXMLHTTP60. This works, too, but there is one problem: oftentimes GET requests that are implemented with XMLHTTP60 instead of the Server version retrieve cached data. The issue arises due to an interplay of factors, which can be hard to pin down.
Since the response is cached, every new request will execute nearly immediately (much faster than the first time you requested it), because you are not actually talking to the server “over the wire”, or over the internet. But the response data will not be updated. For Alpaca, this is particularly noticeable when querying the clock endpoint, but it will rear its ugly head for positions and orders during market hours, since these endpoints will be returning data that is rapidly changing.
Therefore I suggest using the Server version (still available under the Microsoft XML, v6.0 reference I mentioned in the previous article). If you do not, at least add some kind of check to verify that your query is being updated and not retrieving the static cache. You don’t want to POST your order five times only to find out that you bought five times as many shares as you intended!
Wrap Up
This brings us to the end of our basic GET tutorial. There are a couple other GET request endpoints, like assets, the calendar, and the clock (immensely useful for grabbing the timestamp). For some practice, try to run a few queries on those endpoints yourself and try parsing the returned data.
Since you can open a paper trading account without any commitment at Alpaca, it is a great way to practice trading and working through an API. In the next tutorial, I will go through the POST and DELETE requests, which is how we enter and manipulate orders in the system. There is no GUI component to Alpaca, so if you want to use the platform, you’ll need to do it through the API.
Technology and services are offered by AlpacaDB, Inc. Brokerage services are provided by Alpaca Securities LLC (alpaca.markets), member FINRA/SIPC. Alpaca Securities LLC is a wholly-owned subsidiary of AlpacaDB, Inc.


