What is Algorithmic trading?
Algorithmic trading (also called automated trading, black-box trading, or algo-trading) uses a computer program that follows a defined set of instructions (an algorithm) to place a trade. The trade, in theory, can generate profits at a speed and frequency that is impossible for a human trader1. The set of instructions can vary based on the trading strategy being used. Alpaca’s Trading API makes it possible to execute such instructions with minimal effort. You can create a new Alpaca trading account here.
What are Bollinger Bands?
Bollinger bands are a volatility indicator. They are envelopes plotted at a standard deviation level above and below a simple moving average of the price. Because the distance of the bands is based on standard deviation, they adjust to volatility swings in the underlying price2. When the closing price crosses above the upper Bollinger band, it is considered overbought. On the other hand, if the closing price crosses below the lower band, it is considered oversold. Bollinger bands are visually easy to interpret and can be applied across any underlying asset which makes them pretty useful. They also tend to work better in a sideways market so we have to be mindful of when to use them.
What is Relative Strength Index (RSI)?
The relative strength index (RSI) is a momentum indicator used in technical analysis that measures the magnitude of recent price changes to evaluate overbought or oversold conditions in the price of a stock or other asset. The RSI is displayed as an oscillator (a line graph that moves between two extremes) and can have a reading from 0 to 1003. A low value (usually under 30) indicates that the asset has been oversold while a higher value (above 70) indicates that an asset has been overbought.
What are we building?
We will be building an algorithmic trading bot that uses Bollinger Bands and RSI as indicators to trade Bitcoin (BTCUSD) on an hourly time frame. You can find the source code of the bot here.
The bot will buy when the following conditions are met:
- Closing price of our asset is lower than the lower band of the Bollinger Bands indicator
- RSI is lower than a certain predefined value (30)
- We do not have a BTCUSD position
On the other hand, our bot will sell when the following conditions are met:
- Closing price of our asset is higher than the upper band of the Bollinger Bands indicator
- RSI is higher than a certain predefined value (70)
- We have a BTCUSD position
We will use Alpaca’s Market Data API to get the latest bar data for Bitcoin and Trading API to execute our trades.
We will also backtest our trading strategy using Backtrader. More information on Backtrader and its implementation can be found here.
Lets Build!
For convenience and readability, I will break the code into snippets and explain them along the way. So, let’s get started!
from dateutil.relativedelta import relativedelta
import config
import logging
import asyncio
import requests
import pandas as pd
from datetime import date, datetime
from ta.volatility import BollingerBands
from ta.momentum import RSIIndicator
from alpaca_trade_api.rest import REST, TimeFrame
import json
import backtrader as bt
import backtrader.feeds as btfeeds
We start by importing the necessary libraries. I am also importing a file called config.py which contains my Alpaca credentials. It sits in the same root directory as the bot script. You can also find a sample config file I created here.
# ENABLE LOGGING - options, DEBUG,INFO, WARNING?
logging.basicConfig(level=logging.INFO,
                   format='%(asctime)s - %(name)s - %(levelname)s - %(message)s')
logger = logging.getLogger(__name__)


# Alpaca API
ALPACA_BASE_URL = 'https://paper-api.alpaca.markets'
ALPACA_DATA_URL = 'https://data.alpaca.markets'

HEADERS = {'APCA-API-KEY-ID': config.APCA_API_KEY_ID,
          'APCA-API-SECRET-KEY': config.APCA_API_SECRET_KEY}


# Alpaca client
client = REST(config.APCA_API_KEY_ID, config.APCA_API_SECRET_KEY)
In the above code block, we are setting the logging tool so we can log our bot output. This will help us better understand the current status of the bot. The above snippet also initializes the key parameters we will be using to make API calls through Alpaca. ALPACA_BASE_URL is used to access the trading API that Alpaca provides. You might notice that this url has its value set to https://paper-api.alpaca.markets. This gets you access to a paper trading account once you register with Alpaca. It is always a good idea to try a new strategy using a paper trading account first. Once you are confident enough to trade with real money, this url can be changed to https://api.alpaca.markets. We will be using alpaca_trade_api’s REST client to get the latest bar data for our trading pair BTCUSD. To complete a request to Alpaca using the REST client, we need to pass our Alpaca’s Key ID and Secret Key. This information needs to be kept secret since anyone with access to your KeyID and Secret Key can access your Alpaca account. To keep these credentials secret, I have defined them in a file called config.py.
trading_pair = 'BTCUSD'
exchange = 'FTXU'
one_year_ago = datetime.now() - relativedelta(years=1)
start_date = str(one_year_ago.date())
today = date.today()
today = today.strftime("%Y-%m-%d")
rsi_upper_bound = 70
rsi_lower_bound = 30
bollinger_window = 20
waitTime = 3600 # Wait time between each bar request -> 1 hour (3600 seconds)
percent_trade = 0.2
bar_data = 0
latest_bar_data = 0
btc_position = 0
usd_position = 0
Next, we define our global variables relevant to trading and backtesting. Since we will be trading Bitcoin, we need to declare BTCUSD as our trading pair. Alpaca offers market data on multiple exchanges like Coinbase, FTX.US and ErisX and trade execution on FTX.US. For this article, I have chosen ‘FTXU’ as my preferred trading exchange for market data. More information about supported exchanges can be found here.
To backtest a trading strategy, we need to give it a time range to backtest on. one_year_ago and today are defined for this purpose. Next, we define variables that are relevant to the indicators we will be using for our trading strategy. These include rsi_upper_bound, rsi_lower_bound and bollinger_window. waitTime defines how often we will check for the latest bar data.
async def main():
   '''
   Get historical data from Alpaca and calculate RSI and Bollinger Bands.
   Backtest historical data to determine buy/sell/hold decisions and test performance.
   After backtesting, plot the results. Then, enter the loop to wait for new data and
   calculate entry and exit decisions.
   '''
   # Log the current balance of the MATIC token in our Alpaca account
   logger.info('BTC Position on Alpaca: {0}'.format(get_positions()))
   # Log the current Cash Balance (USD) in our Alpaca account
   global usd_position
   usd_position = float(get_account_details()['cash'])
   logger.info("USD position on Alpaca: {0}".format(usd_position))
   # Get the historical data from Alpaca for backtesting
   await get_crypto_bar_data(trading_pair, start_date, today, exchange)
   # Add bar_data to a CSV for backtrader
   bar_data.to_csv('bar_data.csv', index=False)
   # Create and run a Backtest instance
   await backtest_returns()

   while True:
       l1 = loop.create_task(get_crypto_bar_data(
           trading_pair, start_date, today, exchange))
       # Wait for the tasks to finish
       await asyncio.wait([l1])
       # Check if any trading condition is met
       await check_condition()
       # Wait for the a certain amount of time between each bar request
       await asyncio.sleep(waitTime)
The above code block can be broken down in 2 parts. First, we get our existing positions on Alpaca, retrieve the latest bar data, save it to a CSV file and backtest our strategy. Backtesting our strategy gives us a rough idea of how the trading bot might perform with live data. It does not guarantee future returns based on past performance.
The second part of the function involves running an endless while loop that gets the latest bar data, checks if there are any trading conditions and waits for a given amount of time before repeating the same steps. While checking for trading conditions, it also executes trades if a suitable condition arises.
Now that we have a good understanding of what’s happening in the main method, let’s try to understand the individual functions it calls.
async def get_crypto_bar_data(trading_pair, start_date, end_date, exchange):
   '''
   Get bar data from Alpaca for a given trading pair and exchange
   '''
   try:

       bars = client.get_crypto_bars(
           trading_pair, TimeFrame.Hour, start=start_date, end=end_date, limit=10000, exchanges=exchange).df

       bars = bars.drop(
           columns=["trade_count", "exchange"], axis=1)

       # Get RSI for the bar data
       bars = get_rsi(bars)
       # Get Bollinger Bands for the bar data
       bars = get_bb(bars)
       bars = bars.dropna()
       bars['timestamp'] = bars.index

       # Assigning bar data to global variables
       global latest_bar_data
       global bar_data
       bar_data = bars
       # The latest bar data is the last bar in the bar data
       latest_bar_data = bars[-1:]
   # If there is an error, log it
   except Exception as e:
       logger.exception(
           "There was an issue getting trade quote from Alpaca: {0}".format(e))
       return False

   return bars
First function we look at is get_crypto_bar_data. This code block helps us get the bar data from Alpaca. We use alpaca_trade_api’s REST client and get_crypto_bar method to retrieve the historical bar data until ‘today’. Keep in mind that to get Historical Data you will need to pass in the start date of the period you want the historical data for. In our example, we have set it to a year before today’s date. Once we have the bar_data, we drop the columns that we won’t be using. These include trade_count, symbol, timeframe and exchange. With the bar data in hand, we try to add indicators we need for our strategy to work. Get_rsi and get_bb are helper functions that add RSI and Bollinger Bands indicators to the bar_data dataframe. Once the indicators are added, we initialize latest_bar_data with the last value from the bar_data dataframe.
async def check_condition():
   logger.info("Checking BTC position on Alpaca")
   global btc_position
   btc_position = float(get_positions())
   # Log the latest closing price, RSI, and Bollinger Bands
   logger.info("Checking Buy/Sell conditions for Bollinger bands and RSI")
   logger.info("Latest Closing Price: {0}".format(
       latest_bar_data['close'].values[0]))
   logger.info("Latest Upper BB Value: {0}".format(
       latest_bar_data['bb_upper'].values[0]))
   logger.info("Latest MAvg BB Value: {0}".format(
       latest_bar_data['bb_mavg'].values[0]))
   logger.info("Latest Lower BB Value: {0}".format(
       latest_bar_data['bb_lower'].values[0]))
   logger.info("Latest RSI Value: {0}".format(
       latest_bar_data['rsi'].values[0]))

   if latest_bar_data.empty:
       logger.info("Unable to get latest bar data")
   # If we have a position, bollinger high indicator is 1 and RSI is above the upperbound, then sell
   if ((latest_bar_data['bb_hi'].values[0] == 1) & (latest_bar_data['rsi'].values[0] > rsi_upper_bound) & (btc_position > 0)):
       logger.info(
           "Sell signal: Bollinger bands and RSI are above upper bound")
       sell_order = await post_alpaca_order(trading_pair, btc_position, 'sell', 'market', 'gtc')
       if sell_order['status'] == 'accepted':
           logger.info("Sell order successfully placed for {0} {1}".format(
               btc_position, trading_pair))
       elif (sell_order['status'] == 'pending_new'):
           logger.info("Sell order is pending.")
           logger.info("BTC Position on Alpaca: {0}".format(get_positions()))
       else:
           logger.info("Sell order status: {0}".format(sell_order))
   # If we do not have a position, bollinger low indicator is 1 and RSI is below the lowerbound, then buy
   elif ((latest_bar_data['bb_li'].values[0] == 1) & (latest_bar_data['rsi'].values[0] < rsi_lower_bound) & (btc_position == 0)):
       logger.info("Buy signal: Bollinger bands and RSI are below lower bound")
       qty_to_buy = (percent_trade * usd_position) / latest_bar_data['close'].values[0]
       buy_order = await post_alpaca_order(trading_pair, qty_to_buy, 'buy', 'market', 'gtc')
       if buy_order['status'] == 'accepted':
           logger.info("Buy order successfully placed for {0} {1}".format(
               qty_to_buy, trading_pair))
       elif (buy_order['status'] == 'pending_new'):
           logger.info("Buy order is pending.")
           logger.info("BTC Position on Alpaca: {0}".format(get_positions()))
       else:
           logger.info("Buy order status: {0}".format(buy_order))
   # If we do not meet the above conditions, then we hold till we analyze the next bar
   else:
       logger.info("Hold signal: Bollinger bands and RSI are within bounds")
The above code block is the brains behind our strategy. It starts by logging the latest indicators, our current position on Alpaca and the latest closing price of BTCUSD. If we have a position, the bollinger band's high indicator is 1 (high) and then RSI is above the predefined upper bound, we sell the asset. On the other hand, if we do not have a current position in BTCUSD, the bollinger band’s low indicator is 1 (high) and RSI is below a predefined lower bound then we buy the asset. If neither of these conditions are met, then we hold until we analyze a new bar for these conditions.
If the buy/sell conditions are met, we post a market order to Alpaca relevant to the condition encountered. The order posted is a certain percentage of the USD cash balance we hold in our Alpaca account. This is because we do not want to use all our cash balance to trade on just one asset. For demonstration purposes, I have set this percentage (percent_trade) to 0.2 representing 20% of our cash balance.
def get_bb(df):
   # calculate bollinger bands
   indicator_bb = BollingerBands(
       close=df["close"], window=bollinger_window, window_dev=2)
   # Add Bollinger Bands to the dataframe
   df['bb_mavg'] = indicator_bb.bollinger_mavg()
   df['bb_upper'] = indicator_bb.bollinger_hband()
   df['bb_lower'] = indicator_bb.bollinger_lband()

   # Add Bollinger Band high indicator
   df['bb_hi'] = indicator_bb.bollinger_hband_indicator()
   # Add Bollinger Band low indicator
   df['bb_li'] = indicator_bb.bollinger_lband_indicator()
   return df


def get_rsi(df):
   indicator_rsi = RSIIndicator(close=df["close"], window=14)
   df['rsi'] = indicator_rsi.rsi()
   return df
In the snippet above, we have defined a couple of helper functions get_bb() and get_rsi(). get_bb() adds Bollinger bands indicators to the dataframe. It is calculated using ta-lib library’s BollingerBands() method with a predefined bollinger window (20) and bands (upper, lower) separated by 2 standard deviations. Bb_hi indicates when the closing price of the asset crosses above the upper Bollinger band while bb_li indicates closing price crossing below the lower band.
get_rsi() returns a dataframe with the RSI indicator. Like Bollinger bands it uses the ta-lib library to calculate the metric over a period of 14 bars. This means it uses the latest 14 closing prices to calculate the RSI.
def get_positions():
   '''
   Get positions on Alpaca
   '''
   try:
       positions = requests.get(
           '{0}/v2/positions'.format(ALPACA_BASE_URL), headers=HEADERS)
       logger.info('Alpaca positions reply status code: {0}'.format(
           positions.status_code))
       if positions.status_code != 200:
           logger.info(
               "Undesirable response from Alpaca! {}".format(positions.json()))
       if len(positions.json()) != 0:
           btc_position = positions.json()[0]['qty']
       else:
           btc_position = 0
       logger.info('BTC Position on Alpaca: {0}'.format(btc_position))
   except Exception as e:
       logger.exception(
           "There was an issue getting positions from Alpaca: {0}".format(e))
   return btc_position
In the code block above we are trying to retrieve our existing BTCUSD position on Alpaca. We need this to decide if we will be buying or selling when the condition arises. Here, we use the /v2/positions endpoint provided by Alpaca. The code above assumes that we are only trading BTCUSD. If you are trading anything other than BTCUSD, you will need to slightly modify the logic to iterate over the response object.
def get_account_details():
   '''
   Get Alpaca Trading Account Details
   '''
   try:
       account = requests.get(
           '{0}/v2/account'.format(ALPACA_BASE_URL), headers=HEADERS)
       if account.status_code != 200:
           logger.info(
               "Undesirable response from Alpaca! {}".format(account.json()))
           return False
   except Exception as e:
       logger.exception(
           "There was an issue getting account details from Alpaca: {0}".format(e))
       return False
   return account.json()
In the snippet above, we are using Alpaca’s /v2/account endpoint to check our account information. We use this information to calculate our USD cash balance on the exchange.
async def post_alpaca_order(symbol, qty, side, type, time_in_force):
   '''
   Post an order to Alpaca
   '''
   try:
       order = requests.post(
           '{0}/v2/orders'.format(ALPACA_BASE_URL), headers=HEADERS, json={
               'symbol': symbol,
               'qty': qty,
               'side': side,
               'type': type,
               'time_in_force': time_in_force,
               'client_order_id': 'bb_rsi_strategy'
           })
       logger.info('Alpaca order reply status code: {0}'.format(
           order.status_code))
       if order.status_code != 200:
           logger.info(
               "Undesirable response from Alpaca! {}".format(order.json()))
           return False
   except Exception as e:
       logger.exception(
           "There was an issue posting order to Alpaca: {0}".format(e))
       return False
   return order.json()
The function declared above tries to place a market order on Alpaca based on the conditions we defined earlier (Bollinger Bands, RSI and current position). It makes a POST request to Alpaca’s /v2/orders endpoint to submit this order. Once the order is submitted, we check the response object for the status code and log it. Similarly, if there is any error while submitting the order we try to log it with the exception block.
class BB_RSI_Strategy(bt.Strategy):
   '''Class to backtest Bollinger Bands and RSI strategy'''

   def log(self, txt, dt=None):
       # Logging function for this strategy
       dt = dt or self.datas[0].datetime.date(0)
       print('%s, %s' % (dt.isoformat(), txt))

   def __init__(self):
       # Initialize the strategy data and indicators
       self.dataclose = self.datas[0].close
       self.bband = bt.indicators.BBands(
           self.datas[0], period=20)
       self.rsi = bt.indicators.RSI_SMA(self.data.close, period=14)

       self.order = None

   def notify_order(self, order):
       # Notification of an order being submitted/filled
       if order.status in [order.Submitted, order.Accepted]:
           # Buy/Sell order submitted/accepted to/by broker - Nothing to do
           return
       # If the order has been completed we log it
       if order.status in [order.Completed]:
           if order.isbuy():
               self.log('BUY EXECUTED, %.2f' % order.executed.price)
           elif order.issell():
               self.log('SELL EXECUTED, %.2f' % order.executed.price)

       self.order = None

   def next(self):
       # Simply log the closing price of the series from the reference
       self.log('Close, %.2f' % self.dataclose[0])
       if self.order:
           return
       # If we do not have a position, the closing price is below the lower
       # BBand and RSI is lower than the lower bound then we enter a long position (BUY)
       if not self.position:
           if self.dataclose[0] < self.bband.lines.bot and self.rsi[0] < rsi_lower_bound:
               self.order = self.buy()
               self.log('BUY CREATED, %.2f' % self.dataclose[0])
       # If we have a position, the closing price is above the upper BBand and RSI is above
       # the upper bound then we sell our position
       else:
           if self.dataclose[0] < self.bband.lines.bot and self.rsi[0] < rsi_lower_bound:
               self.order = self.sell()
               self.log('SELL CREATED, %.2f' % self.dataclose[0])
In the snippet above, we define a Backtrader Strategy class to backtest our logic. To read more about Backtrader and how to use it check this out. This class involves 4 methods that are important to backtesting a trading strategy.
First, we define log(). This method takes care of our logging needs. It is quite helpful as it tells us about the actions that are taking place while backtesting. This function runs every time we ask it to log something.
Second, we define __init__() method. This method only runs once at the start while backtesting. Here, we initialize our closing prices, Bollinger Bands, RSI indicators and if we have any existing orders. Note that these indicators are similar in functionality to the ones we defined above but are using Backtrader’s library to calculate them.
Third, we define the notify() method. This function checks the status of our order submitted while backtesting. If the order has been submitted or accepted, we do nothing as we are waiting for the order to get completed. Once the order has been completed, it logs the kind of order executed.
Finally, we define the next() method. This method follows the logic of our original trading strategy for Bollinger Bands and RSI. It also checks if we have a current position and order in place. As we defined our trading logic earlier in check_condition(), this method also checks for similar conditions and executes an order based on those conditions.
async def backtest_returns():

   cerebro = bt.Cerebro()
   data = btfeeds.GenericCSVData(
       dataname='bar_data.csv',

       fromdate=datetime(2021, 7, 9, 0, 0, 0, 0),
       todate=datetime(2022, 7, 8, 0, 0, 0, 0),

       nullvalue=0.0,

       dtformat=('%Y-%m-%d %H:%M:%S%z'),
       timeframe=bt.TimeFrame.Minutes,
       compression=60,
       datetime=12,
       high=1,
       low=2,
       open=0,
       close=3,
       volume=4,
       openinterest=-1,
       rsi=6,
       bb_hi=10,
       bb_li=11
   )
   cerebro.broker.set_cash(100000.0)
   cerebro.addsizer(bt.sizers.PercentSizer, percents=20)
   cerebro.adddata(data)
   cerebro.addstrategy(BB_RSI_Strategy)
   print("Starting Portfolio Value: ${}".format(cerebro.broker.getvalue()))

   cerebro.run()

   print("Final Portfolio Value: ${}".format(cerebro.broker.getvalue()))

   cerebro.plot()

   return
Now that we have defined our backtesting class, we are ready to test it out. This involves creating an instance of Cerebro engine. You can read more about Cerebro here.
This class is the cornerstone of backtrader because it serves as a central point for4:
- Gathering all inputs (Data Feeds), actors (Strategies), spectators (Observers), critics (Analyzers) and documenters (Writers) ensuring the show still goes on at any moment.
- Execute the backtesting/or live data feeding/trading
- Returning the results
- Giving access to the plotting facilities
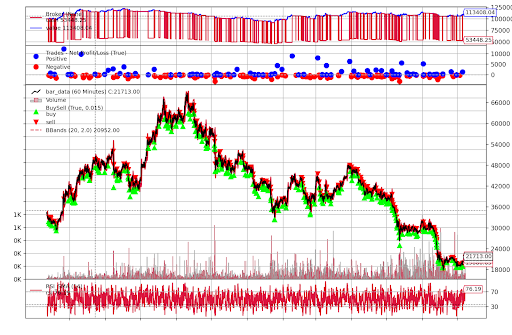
We need to initialize a few cerebro before we can begin testing it. First, we create a data feed using the CSV file we created in the main() function. More details on initializing the data feed can be found here. Next, we add how much cash we would like to backtest with. In this example I have set it to $100,000 which is the same amount you get when paper-trading on Alpaca. This is followed by adding a sizer, the data feed and strategy to the Cererbo instance we just created. Sizer specifies how much of our account balance we would like to use when placing a trade. I have currently set it to 20% of our net portfolio ($100,000). Then we print out our starting balance before and after the backtest is run. Going one step further, I have also added a plot that lets you visualize your trades. It looks something like the one below.
loop = asyncio.get_event_loop()
loop.run_until_complete(main())
loop.close()
Now that we have covered all the functions in the code, it's time to run it. We are using the asyncio library to run our functions asynchronously.
Congratulations! You just built an algo-trading bot that trades using Bollinger Bands and RSI indicators.
A Few Takeaways
Alpaca provides us with a paper environment to test our trades. We can also use Backtrader simultaneously to backtest a trading strategy before deploying it with real cash. Alpaca's Market Data and Trading APIs are super easy to use. Their docs are well written and provide Postman workspace to test out their APIs too.
The logic to check for trading conditions is quite simple in its approach as of now. At the very least, it should give you a good starting point to trading using API's and understanding Bollinger Bands and RSI as indicators.
Please note: Applicable trading fees must be considered when evaluating trading costs with respect to potential trading opportunities.
Sources:
- https://www.investopedia.com/articles/active-trading/101014/basics-algorithmic-trading-concepts-and-examples.asp
- https://www.fidelity.com/learning-center/trading-investing/technical-analysis/technical-indicator-guide/bollinger-bands#:~:text=Bollinger%20Bands%20are%20envelopes%20plotted,Period%20and%20Standard%20Deviations%2C%20StdDev.
- https://www.investopedia.com/terms/r/rsi.asp#:~:text=The%20Relative%20Strength%20Index%20(RSI)%20is%20a%20measurement%20used%20by,scale%20of%200%20to%20100
- https://www.backtrader.com/docu/cerebro/
Please note that this article is for informational purposes only. The example above is for illustrative purposes only. Actual crypto prices may vary depending on the market price at that particular time. Alpaca Crypto LLC does not recommend any specific cryptocurrencies.
Cryptocurrency is highly speculative in nature, involves a high degree of risks, such as volatile market price swings, market manipulation, flash crashes, and cybersecurity risks. Cryptocurrency is not regulated or is lightly regulated in most countries. Cryptocurrency trading can lead to large, immediate and permanent loss of financial value. You should have appropriate knowledge and experience before engaging in cryptocurrency trading. For additional information please click here.
Cryptocurrency services are made available by Alpaca Crypto LLC ("Alpaca Crypto"), a FinCEN registered money services business (NMLS # 2160858), and a wholly-owned subsidiary of AlpacaDB, Inc. Alpaca Crypto is not a member of SIPC or FINRA. Cryptocurrencies are not stocks and your cryptocurrency investments are not protected by either FDIC or SIPC. Please see the Disclosure Library for more information.
This is not an offer, solicitation of an offer, or advice to buy or sell cryptocurrencies, or open a cryptocurrency account in any jurisdiction where Alpaca Crypto is not registered or licensed, as applicable.