Please note that this article is for educational and informational purposes only. All screenshots are for illustrative purposes only. The views and opinions expressed are those of the author and do not reflect or represent the views and opinions of Alpaca. Alpaca does not recommend any specific securities or investment strategies.
This article originally appeared on Medium, written by Tyler van der Hoeven
Crypto is my first financial love. It’s weird, fresh and addresses some of the most fundamental issues with existing traditional financial foundations. The existing financial landscape is a sea of isolated islands, crypto reverses the islands for the sea introducing aquatic collaboration and amorphousness. Where once social, economic and geographic borders defined who was in and who was out now inclusion and access rule the day.
This isn’t a post about the benefits of crypto however, this is a technical post about setting up dollar cost averaging (DCA) purchases of traditional stocks and ETFs using the Alpaca API. I love crypto but I also understand the value of a diversified portfolio and of playing the long game as technical revolutions happen slowly by utilizing today’s tools to build tomorrow’s changes.
TL;DR
 tyvdh
tyvdhPrerequisites
Before we can make any progress, you’ll need to setup two obvious prerequisites. A Cloudflare account and an Alpaca account, let’s set those up.
The goal here is to get to a point after generating a Cloudflare account where you can see and access the Workers page.
The goal here is to get to a point after generating an Alpaca account where you can access Paper Trading. (Alpaca’s testnet)
Prepare The App
Today’s app will be written in JavaScript and utilize Cloudflare’s Wrangler CLI tool to help us deploy the app to the Cloudflare Worker environment. Let’s go ahead and get that tool installed and our app initialized.
$ npm i @cloudflare/wrangler -gIf you encounter errors, follow any additional instructions here.
Next, we’ll create our app directory and initialize both the wrangler app and npm.
$ mkdir easy-dca-wrangler
$ cd easy-dca-wrangler
$ wrangler init
$ npm init -y
Cool, now let’s get some basic files changed and added.
// UPDATE package.json
{
  "private": true,
  "main": "./src/index.js",
  "scripts": {
    "deploy": "wrangler publish"
  },
  "dependencies": {
    "bluebird": "^3.7.2",
    "lodash": "^4.17.21"
  },
  "devDependencies": {
    "@babel/core": "^7.13.10",
    "@babel/plugin-proposal-optional-chaining": "^7.13.8",
    "@babel/preset-env": "^7.13.10",
    "babel-loader": "^8.2.2"
  }
}
// CREATE babel.config.json
{
"presets": [
[
"@babel/preset-env",
{
"targets": {
"node": "current"
}
}
]
],
"plugins": [
"@babel/plugin-proposal-optional-chaining"
]
}// UPDATE wrangler.toml
name = "easy-dca-wrangler"
type = "webpack"
account_id = "{change-me-to-your-cloudflare-account-id}" # You can find this on the sidebar of the worker page in the Cloudflare dashboard. Right now it's labeled "API tokens".
webpack_config = "webpack.config.js"
workers_dev = true
[triggers]
crons = ["0 * * * *", "0 0 * * *"]// CREATE webpack.config.js
module.exports = {
entry: './src/index.js',
target: 'webworker',
module: {
rules: [
{
test: /\.c?js$/, exclude: /node_modules/, loader: 'babel-loader'
}
]
}
}Perfect, now let’s get things installed and move onto the meat of our project.
$ npm iBefore we can get much further we need to deploy a “dummy” worker just as a namespace placeholder while we get some secret Alpaca env vars added to the project. To do that let’s create a ./src directory and add a dead basic index.js file.
$ mkdir src
$ touch ./src/index.js
Let’s open and fill out that index.js file in our code editor now.
// UPDATE ./src/index.js

async function handleFetch(event) {
  return new Response(null, {
    status: 204,
    headers: {
      'Access-Control-Allow-Origin': '*'
    }
  })
}

addEventListener('fetch', (event) => event.respondWith(handleFetch(event)))
Perfect, nothing really at all going on here, just some basic Cloudflare Worker endpoint boilerplate to get a placeholder worker successfully deployed to our account. Let’s do that now.
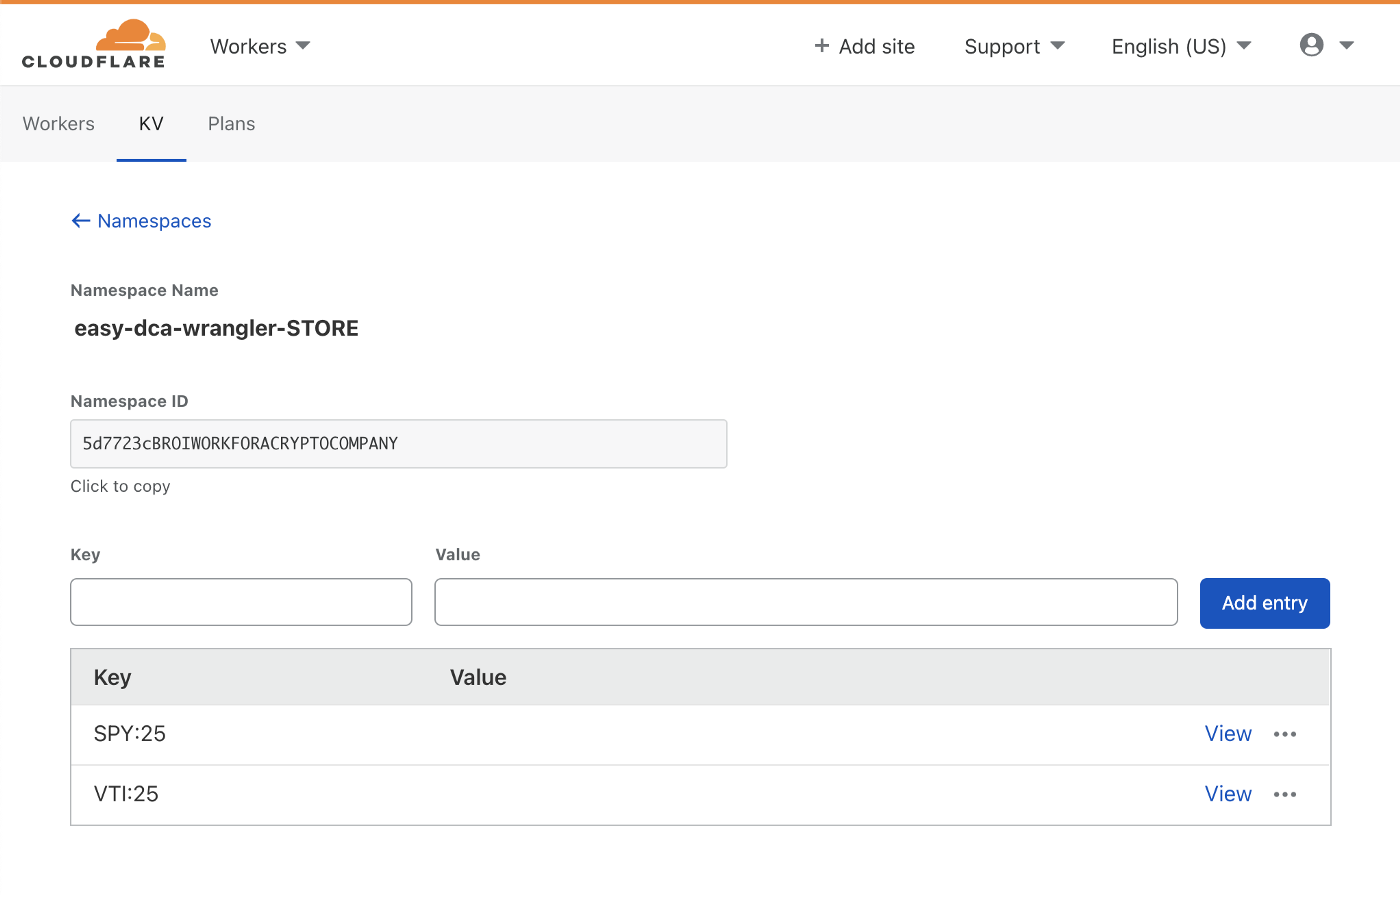
$ npm run deployIf successful you should now be able to setup a Key Value namespace under this worker and and tie it into our new worker.
$ wrangler kv:namespace create "STORE"This command will output a tiny toml array that looks something like this:
kv_namespaces = [
  { binding = "STORE", id = "{some-id-looking-string}" }
]
Copy this whole key and value toml pair and paste it into your wrangler.toml file. It would then look something like this:
// UPDATE wrangler.toml
name = "easy-dca-wrangler"
type = "webpack"
account_id = "{change-me-to-your-cloudflare-account-id}" # You can find this on the sidebar of the worker page in the Cloudflare dashboard. Right now it's labeled "API tokens".
webpack_config = "webpack.config.js"
workers_dev = true
kv_namespaces = [
  { binding = "STORE", id = "{some-id-looking-string}" }
]
[triggers]
crons = ["0 * * * *", "0 0 * * *"]
Okay great! We’ve added and attached a Key Value database to our worker. Now we just need to update our ./src/index.js to include our actual DCA business logic.
Before we do that, we need to create a really simple utility JS file containing some simple utils which will make our life a little easier later on.
$ mkdir ./src/@js
$ touch ./src/@js/utils.js
To that ./src/@js/utils.js file we will add the following content:
// UPDATE ./src/@js/utils.js

export async function handleResponse(response) {
  if (response.ok)
    return response.headers.get('content-type')?.indexOf('json') > -1 ? response.json() : response.text()

  throw response
}

export async function parseError(err) {
  try {
    if (typeof err === 'string')
      err = {message: err, status: 400}

    if (err.headers?.has('content-type'))
      err.message = err.headers.get('content-type').indexOf('json') > -1 ? await err.json() : await err.text()

    if (!err.status)
      err.status = 400

    return new Response(
      JSON.stringify({
        ...(typeof err.message === 'string' ? {message: err.message} : err.message),
        status: err.status,
      }),
      {
        status: err.status,
        headers: {
          'Access-Control-Allow-Origin': '*',
          'Content-Type': 'application/json',
          'Cache-Control': 'no-store'
        }
      }
    )
  }

  catch(err) {
    return new Response(JSON.stringify(err), {
      status: 500,
      headers: {
        'Access-Control-Allow-Origin': '*',
        'Content-Type': 'application/json',
        'Cache-Control': 'no-store'
      }
    })
  }
}
Don’t worry too much about the contents here, it’s just two exported functions, one for handling fetch responses and another for handling any thrown errors and responding with an appropriately formatted Response object. If you do much Cloudflare Worker development these are two really nice helper functions you may want to incorporate into future projects.
With the helpers prepared we can finally focus our attention on filling out our ./src/index.js page. You’ll be happy to learn it’s actually not much longer than our utils file.
// UPDATE ./src/index.js

import Bluebird from 'bluebird'
import { map as loMap } from 'lodash'

import { handleResponse, parseError } from './@js/utils'

async function handleFetch(event) {
  try {
    const handleScheduledResponse = await handleScheduled(event)

    return new Response(JSON.stringify(handleScheduledResponse), {
      status: 200,
      headers: {
        'Access-Control-Allow-Origin': '*',
        'Content-Type': 'application/json'
      }
    })
  }

  catch(err) {
    return parseError(err)
  }
}

function handleScheduled(event) {
  return STORE
  .list()
  .then(({keys}) => loMap(keys, 'name'))
  .then((pairs) =>
    Bluebird.mapSeries(pairs, (symbol_notional) => {
      const [
        symbol,
        notional
      ] = symbol_notional.split(':')

      return fetch('https://paper-api.alpaca.markets/v2/orders', {
        method: 'POST',
        headers: {
          'APCA-API-KEY-ID': APCA_PAPER_API_KEY_ID,
          'APCA-API-SECRET-KEY': APCA_PAPER_API_SECRET_KEY,
          'Content-Type': 'application/json'
        },
        body: JSON.stringify({
          symbol,
          notional,
          side: 'buy',
          type: 'market',
          time_in_force: 'day'
        })
      }).then(handleResponse)
    })
  )
}

addEventListener('fetch', (event) => event.respondWith(handleFetch(event)))
addEventListener('scheduled', (event) => event.waitUntil(handleScheduled(event)))
So simple? That’s right! Just the way I like it. Let’s walk through it.
The primary function performing all the logic is the handleScheduled function. In fact the handleFetch function just allows us to call that function using a REST API endpoint to test it since it’s intended to only be called by the Cloudflare Worker cron trigger. (which can make testing a little tricky)
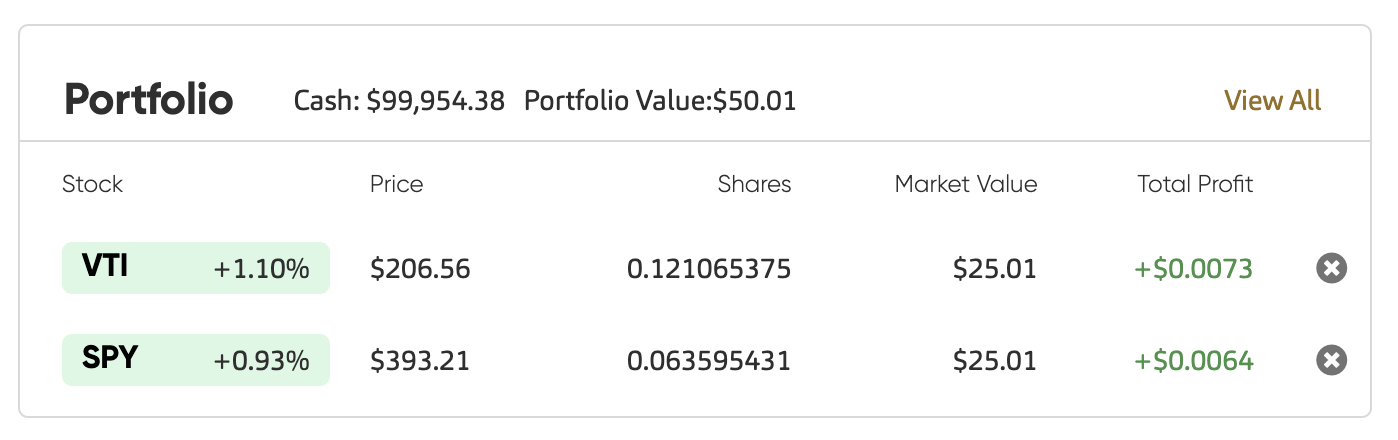
So what’s happening in handleScheduled function? It’s a promise chain starting with a selection of every item in the STORE we setup earlier. We haven’t added anything to that database yet but don’t worry, we will. Next it maps the response array of that list down into a simple array of name strings. It will expect the names to be formatted like "{symbol:amount}" e.g. "VTI:25". Which will signal to the app that whenever the handleScheduled function is triggered it should place an order for $25 of VTI. Yay fractional shares!
After formatting all the orders into an array the next step is to create a serialized promise map of those symbol:amount pairs and actually begin placing orders via the Alpaca API. The request is a simple application/json POST request with a stringified body of:
{
  symbol,
  notional,
  side: 'buy',
  type: 'market',
  time_in_force: 'day'
}
The astute observer will notice two BIG variables we have yet to assign though. APCA_PAPER_API_KEY_ID and APCA_PAPER_API_SECRET_KEY. Yes, very astute of you. Let’s get those assigned and added to Cloudflare.
On the Alpaca side, make sure you’ve selected your Paper Trading account (gives you a fat stack of play money).
Next, generate a new paper trading API key. Once generated, the UI will show you both an API Key ID and an API Secret Key. These are what you’ll copy and paste to your Cloudflare Worker env var as secrets so don’t close this view just yet.
Back in your terminal let’s get those variables added to your Cloudflare Worker.
$ wrangler secret put APCA_PAPER_API_KEY_ID
// Next step will ask to paste the API Key ID from Alpaca
$ wrangler secret put APCA_PAPER_API_SECRET_KEY
// Next step will ask to paste the API Secret Key from Alpaca
Super! That’s all you have to do, those secrets will now be accessible via the variables you just assigned.
At this point we should be good to deploy.
$ npm run deployIf all goes well, your application should be successfully deployed and depending on your cron triggers will begin placing DCA orders automatically.
OR WILL IT!?
We haven’t added any values to the STORE yet so no it won’t, silly.
Let’s do that now.
$ wrangler kv:key put VTI:25 '' --binding STORE
$ wrangler kv:key put SPY:25 '' --binding STORE
... etc
The Wrangler CLI KV docs are super so be sure and peruse them to understand all the things you can do to add, modify, delete and view your Keys and their Values.
You can also use the Cloudflare Worker dashboard UI to add, remove and modify entries.
You can also use the same dashboard to view, modify and monitor the triggers.
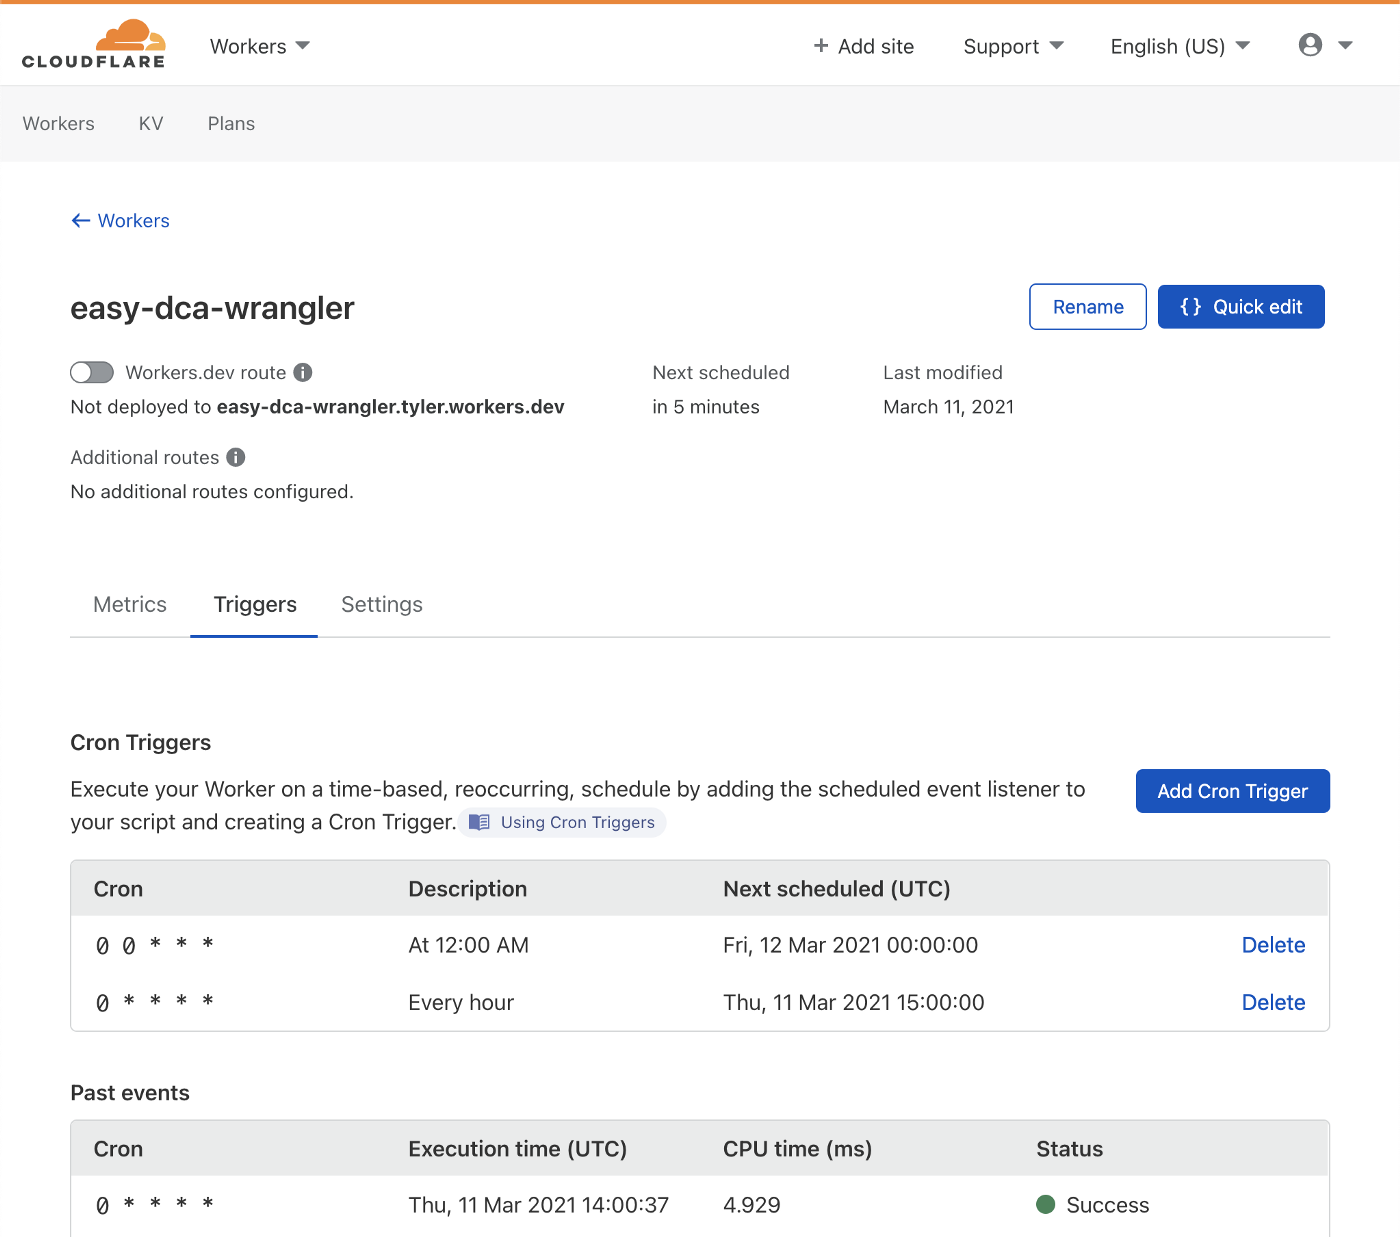
For instance, let’s go ahead and add one that triggers every minute so we can more quickly see our Alpaca order queue filling up.
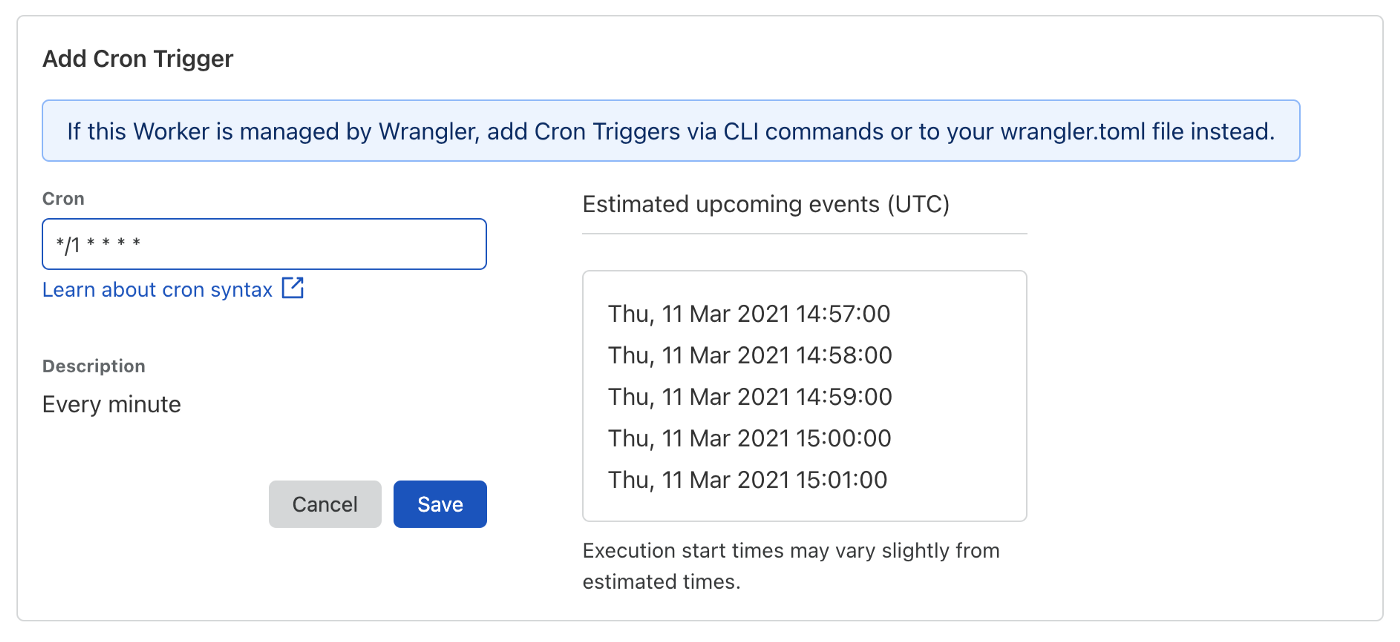
Click save and then in a few minutes you should see some orders flowing into Alpaca for the stocks or ETFs you’ve added to the STORE.
Insane! So easy! So powerful! Remember though with great power comes great responsibility so if you plan on moving this to the Live Trading API please consider the risks and make any appropriate and necessary changes. (Like removing entirely the handleFetch function and listener as well as adjusting the cron triggers both in the dashboard and wrangler.toml file)
This was a fun little app to build. If you’re interested in exploring other fun financial applications follow me on Twitter, this is kinda my thing.

Alpaca does not prepare, edit, or endorse Third Party Content. Alpaca does not guarantee the accuracy, timeliness, completeness or usefulness of Third Party Content, and is not responsible or liable for any content, advertising, products, or other materials on or available from third party sites.
The Paper Trading API is offered by AlpacaDB, Inc. and does not require real money or permit a user to transact in real securities in the market. Providing use of the Paper Trading API is not an offer or solicitation to buy or sell securities, securities derivative or futures products of any kind, or any type of trading or investment advice, recommendation or strategy, given or in any manner endorsed by AlpacaDB, Inc. or any AlpacaDB, Inc. affiliate and the information made available through the Paper Trading API is not an offer or solicitation of any kind in any jurisdiction where AlpacaDB, Inc. or any AlpacaDB, Inc. affiliate is not authorized to do business.
Brokerage services are provided by Alpaca Securities LLC ("Alpaca"), member FINRA/SIPC, a wholly-owned subsidiary of AlpacaDB, Inc. Technology and services are offered by AlpacaDB, Inc. This is not an offer, solicitation of an offer, or advice to buy or sell securities, or open a brokerage account in any jurisdiction where Alpaca is not registered (Alpaca is registered only in the United States).
Interested in getting the latest news and content from Alpaca? Follow us on LinkedIn, Twitter, and Facebook for more.