The purpose of this article is to provide a step-by-step process of how to automate one's algorithmic trading strategies using Alpaca, Python, and Google Cloud. This example utilizes the strategy of pairs trading. Please reference the following GitHub Repo to access the Python script.
 McKlayne
/GettyImages-1166414546-60ca54115e6a4d4594e0e402ad9a5744.jpg)
Step 1: Create accounts for Alpaca and Google Cloud Platform
Alpaca is a commission-free* brokerage platform that allows users to trade via an API. Once you have created an account you will be given an API Key ID and a secret key which you will reference in the Python script. This will create the bridge to automate your trading strategy.
*Commission-free trading means that there are no commission charges for Alpaca self-directed individual cash brokerage accounts that trade U.S. listed securities through an API. Relevant SEC and FINRA fees may apply.

Google Cloud Platform (GCP) is a top-tier cloud computing service. They offer hundreds of cloud products. However, for the purpose of this project, you will only need to use two GCP services. If you’re new to Google Cloud, you can take advantage of the free trial for new users that comes with $300 credit (more than you will need to automate this process). Leveraging a cloud service, such as Google, means that you won’t have to manually run your script — or be worried about your computer being on at the correct time each day.

Once you have created your account, start the free trial. Do this by clicking on “Activate” in the top right corner.

Fill out the necessary information, then create a “New Project”. In this example, it will be labeled, “Algo-trading”.
Step 2: The Python script

The next few steps will go over how to structure the Python script, attach the Alpaca API, send an email notification, and an example of how to build trading logic. The first thing to remember with the Python script is that you will need to create only one function. That function will then be called in Google Cloud. This is crucial to automate the script.
def pairs_trading_algo(self):

    '''All the code necessary to connect to API, trading logic and sending email notification will go in here'''

    return done
Step 3: Connect Alpaca API
You can access your Alpaca API keys from the Alpaca Dashboard, once your account is set up. This example will be shown using the paper trading keys. These can be found on the right side of the dashboard, and below the API Key ID is your very own secret key.
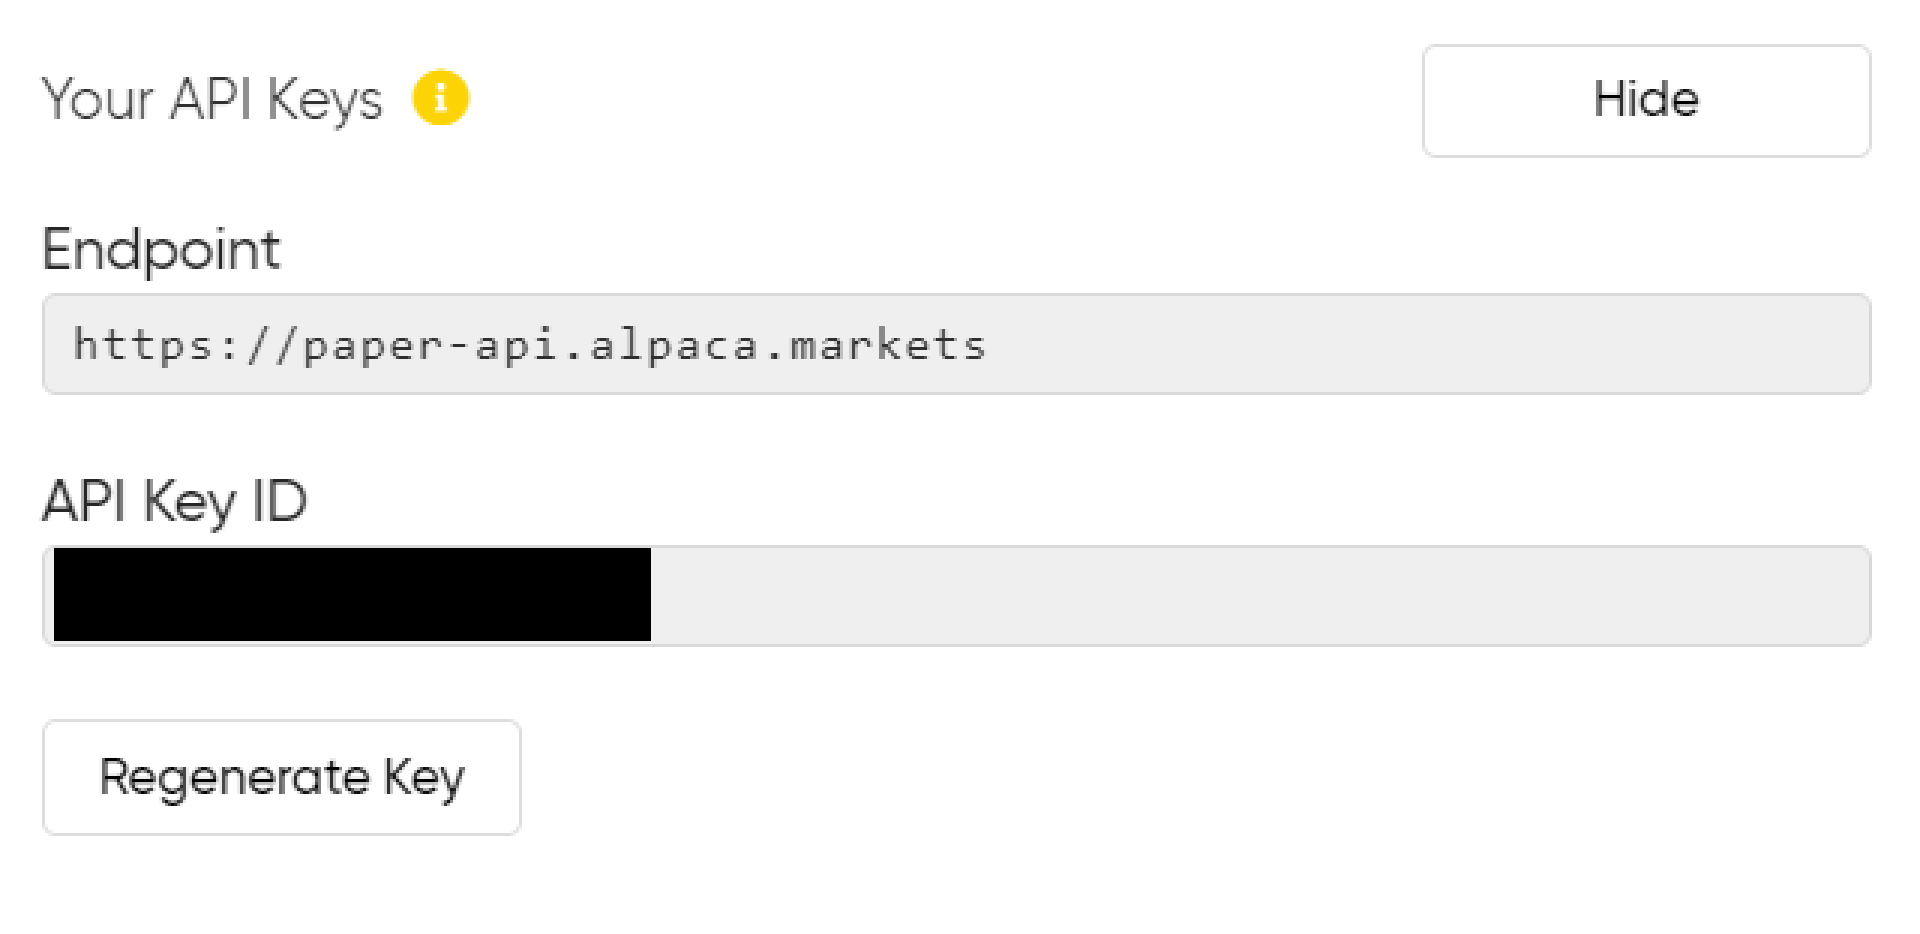
You will need to import the following packages: os, and alpaca_trade_api as tradeapi. Follow Alpaca’s documentation on how to download alpaca_trade_api. Below is a snippet of the code found in the GitHub Repo.
The os.environ section allows you to specify which environment you are connecting to — paper trading or live trading.
APCA_API_KEY_ID is where you will place your API Key ID, APCA_API_SECRET_KEY is where you will place your secret key.
The account variable is making sure that you have an account with Alpaca and that it is active. This variable will be used later on.
import os
import alpaca_trade_api as tradeapi


def pairs_trading_algo(self):
    # Specify paper trading environment
    os.environ['APCA_API_BASE_URL'] = 'https://paper-api.alpaca.markets'

    # Insert API Credentials
    api = tradeapi.REST('APCA_API_KEY_ID', 'APCA_API_SECRET_KEY', api_version='v2')
    account = api.get_account()

    return done
Step 4: Create a new email account and add email notification functionality to Python function
Adding email notifications to your trading script are subjectively awesome—they enable you to know when your script is running and what the outcome is based on the trading strategy.
To get started with adding notifications, please check out this article by Samuel Sam!

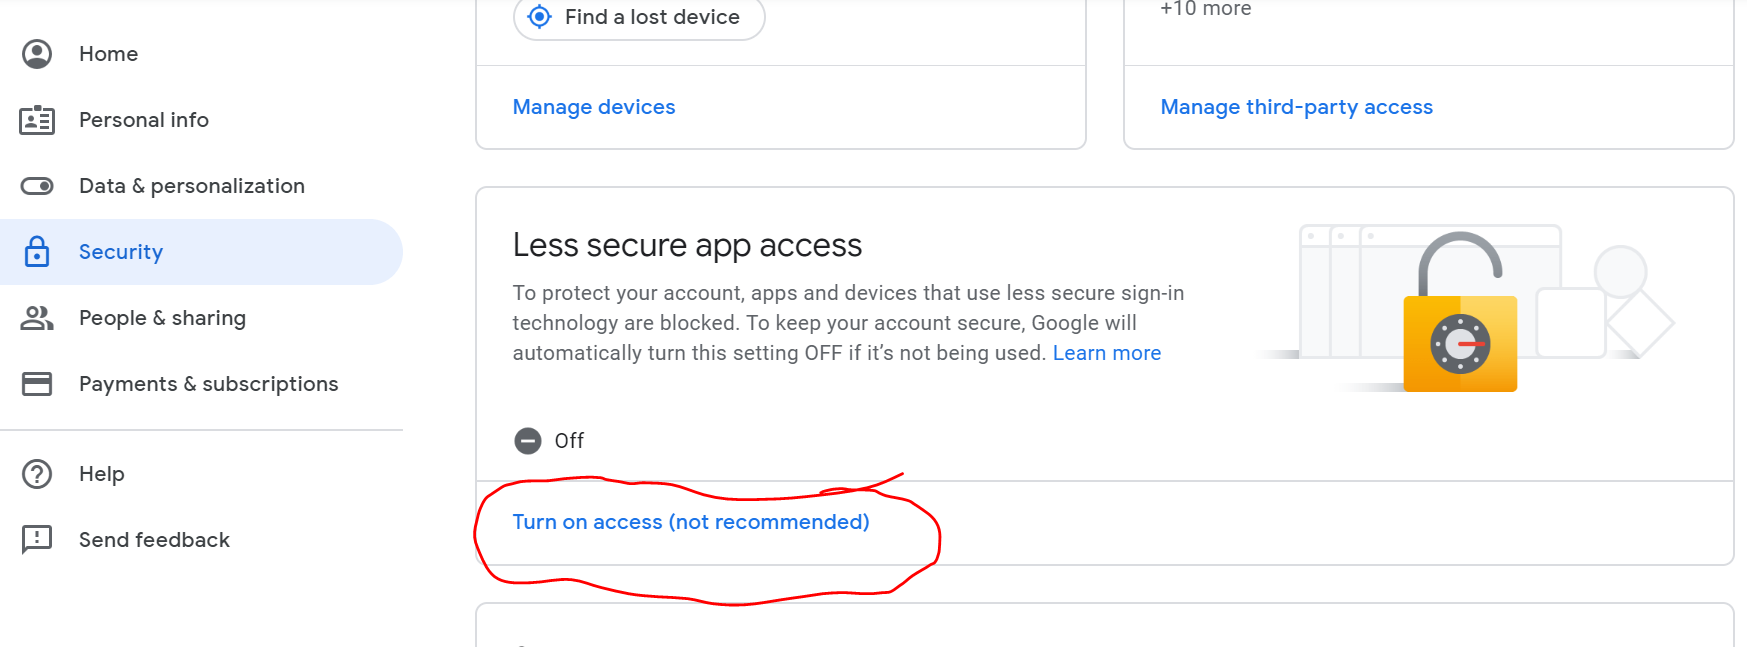
For security reasons, you’ll likely want to create a new email account (in this example Gmail is used, and named “Trading Bot”). The most important step, whether you create a new account or not, is turning on access to less secure sites. Account Settings → Security → Less secure app access ON.
The code snippet below includes the packages necessary to send emails. The subject of the email will be your trading strategy, which will allow you the capability of running multiple trading strategies while staying informed on their success.
import os
import alpaca_trade_api as tradeapi
import smtplib
from email.mime.multipart import MIMEMultipart
from email.mime.text import MIMEText


def pairs_trading_algo(self):
    # Specify paper trading environment
    os.environ['APCA_API_BASE_URL'] = 'https://paper-api.alpaca.markets'

    # Insert API Credentials
    api = tradeapi.REST('APCA_API_KEY_ID', 'APCA_API_SECRET_KEY', api_version='v2')
    account = api.get_account()

    # The mail addresses and password
    sender_address = '[email protected]'
    sender_pass = 'P4ssw0rd'
    receiver_address = '[email protected]'

    # Setup MIME
    message = MIMEMultipart()
    message['From'] = 'Trading Bot'
    message['To'] = receiver_address
    message['Subject'] = 'Pairs Trading Algo'  # The subject line

    return done
Step 5: Build a trading strategy into the script and add certain messages to email
The following example code snippets show a very sloppy way of accessing the free data on Alpaca through IEX Exchange. Just create the needed variables for the trading logic, such as 5-day moving averages and certain spreads.
This example is using ADBE and AAPL. This code is available in the GitHub Repo.
    # Selection of stocks
    days = 1000
    stock1 = 'ADBE'
    stock2 = 'AAPL'

    # Put Hisrorical Data into variables
    stock1_barset = api.get_barset(stock1, 'day', limit=days)
    stock2_barset = api.get_barset(stock2, 'day', limit=days)
    stock1_bars = stock1_barset[stock1]
    stock2_bars = stock2_barset[stock2]

    # Grab stock1 data and put in to a array
    data_1 = []
    times_1 = []
    for i in range(days):
        stock1_close = stock1_bars[i].c
        stock1_time = stock1_bars[i].t
        data_1.append(stock1_close)
        times_1.append(stock1_time)

    # Grab stock2 data and put in to an array
    data_2 = []
    times_2 = []
    for i in range(days):
        stock2_close = stock2_bars[i].c
        stock2_time = stock1_bars[i].t
        data_2.append(stock2_close)
        times_2.append(stock2_time)

    # Putting them together
    hist_close = pd.DataFrame(data_1, columns=[stock1])
    hist_close[stock2] = data_2

    # Current Spread between the two stocks
    stock1_curr = data_1[days-1]
    stock2_curr = data_2[days-1]
    spread_curr = (stock1_curr-stock2_curr)

    # Moving Average of the two stocks
    move_avg_days = 5

    # Moving averge for stock1
    stock1_last = []
    for i in range(move_avg_days):
        stock1_last.append(data_1[(days-1)-i])

    stock1_hist = pd.DataFrame(stock1_last)

    stock1_mavg = stock1_hist.mean()

    # Moving average for stock2
    stock2_last = []
    for i in range(move_avg_days):
        stock2_last.append(data_2[(days-1)-i])
    stock2_hist = pd.DataFrame(stock2_last)
    stock2_mavg = stock2_hist.mean()

    # Sread_avg
    spread_avg = min(stock1_mavg - stock2_mavg)

    # Spread_factor
    spreadFactor = .01
    wideSpread = spread_avg*(1+spreadFactor)
    thinSpread = spread_avg*(1-spreadFactor)

    # Calc_of_shares_to_trade
    cash = float(account.buying_power)
    limit_stock1 = cash//stock1_curr
    limit_stock2 = cash//stock2_curr
    number_of_shares = int(min(limit_stock1, limit_stock2)/2)
Next, add the trading logic with the desired text for the email. The portfolio variable checks to see what your current position is—which is important to the trading algo logic.
    # Trading_algo
    portfolio = api.list_positions()
    clock = api.get_clock()

    if clock.is_open == True:
        if bool(portfolio) == False:
            # detect a wide spread
            if spread_curr > wideSpread:
                # short top stock
                api.submit_order(symbol=stock1, qty=number_of_shares, side='sell', type='market', time_in_force='day')

                # Long bottom stock
                api.submit_order(symbol=stock2, qty=number_of_shares, side='buy', type='market', time_in_force='day')
                mail_content = "Trades have been made, short top stock and long bottom stock"

            # detect a tight spread
            elif spread_curr < thinSpread:
                # long top stock
                api.submit_order(symbol=stock1, qty=number_of_shares, side='buy', type='market', time_in_force='day')

                # short bottom stock
                api.submit_order(symbol=stock2, qty=number_of_shares, side='sell', type='market', time_in_force='day')
                mail_content = "Trades have been made, long top stock and short bottom stock"
        else:
            wideTradeSpread = spread_avg * (1+spreadFactor + .03)
            thinTradeSpread = spread_avg * (1+spreadFactor - .03)
            if spread_curr <= wideTradeSpread and spread_curr >= thinTradeSpread:
                api.close_position(stock1)
                api.close_position(stock2)
                mail_content = "Position has been closed"
            else:
                mail_content = "No trades were made, position remains open"
                pass
    else:
        mail_content = "The Market is Closed"

    # The body and the attachments for the mail
    message.attach(MIMEText(mail_content, 'plain'))

    # Create SMTP session for sending the mail
    session = smtplib.SMTP('smtp.gmail.com', 587)  # use gmail with port
    session.starttls()  # enable security

    # login with mail_id and password
    session.login(sender_address, sender_pass)
    text = message.as_string()
    session.sendmail(sender_address, receiver_address, text)
    session.quit()

    done = 'Mail Sent'

    return done
The clock variable allows you to easily check if the market is open. If it isn’t, you’ll receive an email that says, “The Market is Closed”. In the future, it might be more beneficial to run a script prior to this to check if it is open or closed, rather than correspond via email. You can have this script run in the cloud, saving computing time and money.
mail_content is written throughout the trading algorithm so that it catches whatever occurs dependent on the day. This is then placed in the email, the information for the login is fulfilled and the email is sent.
The last variable is created which is “done” and that is what the function spits out. Your script is ready to go!
Step 6: Create a Google Cloud Function
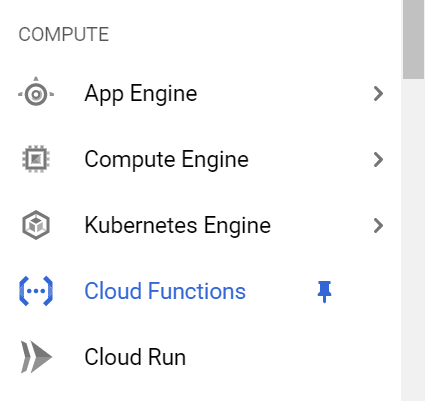
Next, open up Google Cloud console. Make sure that you are in your algo-trading project and then navigate to Cloud Functions on the left side panel, found under compute. You can always pin it for ease (shown below).
Click “Create Function” at the top. This will take you to a page that looks like this.
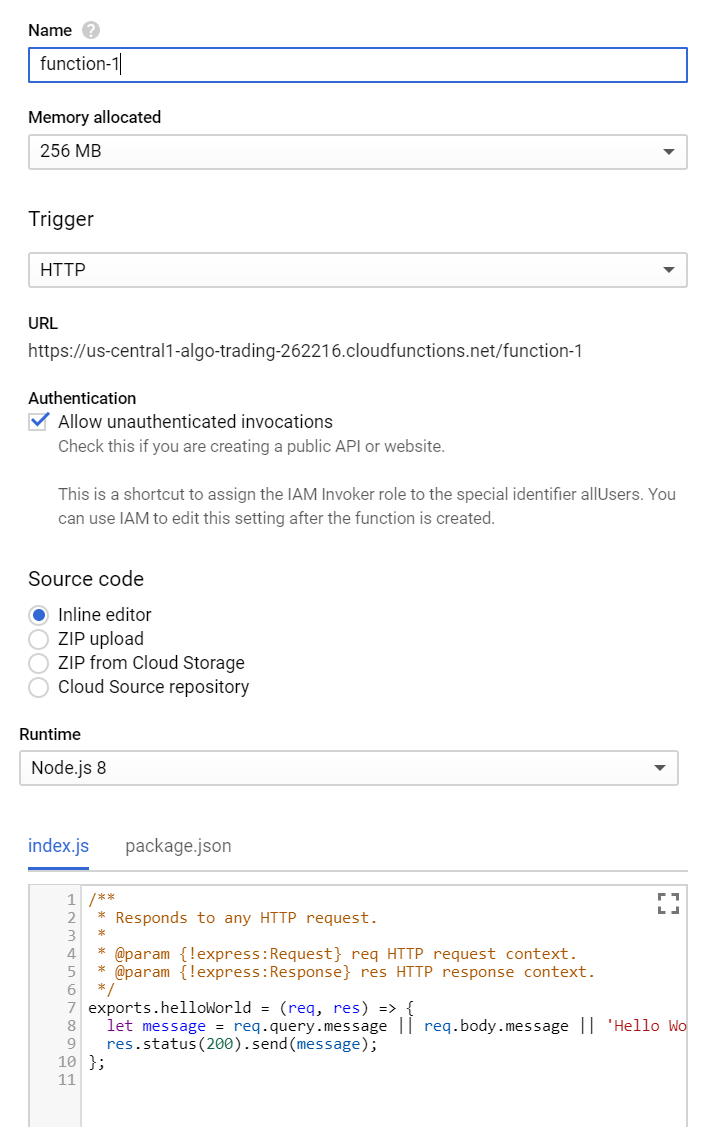
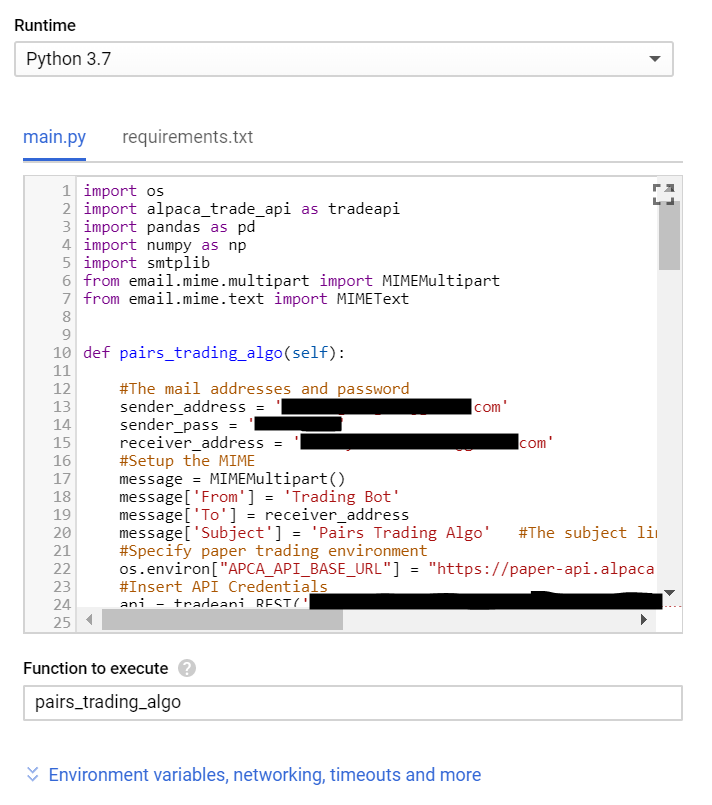
Name the function whatever you would like. You can keep all the preset settings, but change the Runtime to Python 3.7. Then, copy and paste the Python script you have created into main.py. Make sure to put the name of the function in the Function to Execute box.
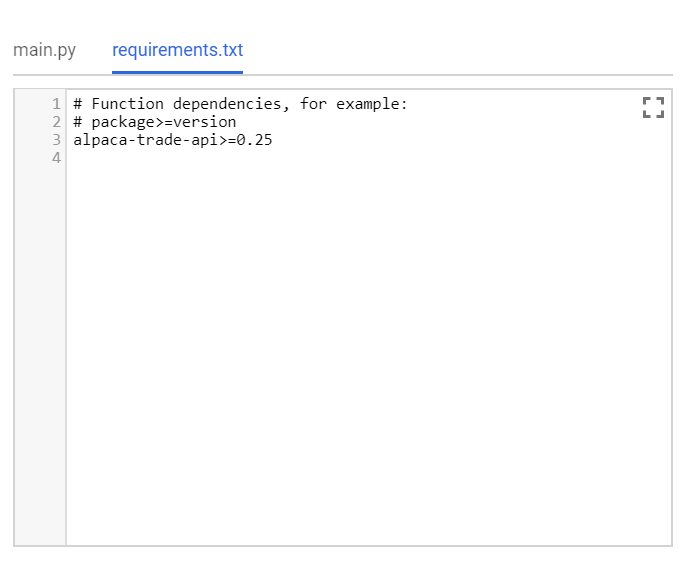
The last step is to add the necessary packages in the requirements.txt. This makes it so the cloud knows what packages you need for your Python script to run. Go ahead and deploy the function.
Note: You may need to add other packages to this list if you add them to your main.py. Your function will not deploy if there are any packages missing from the requirements.txt.
To test the function, navigate to the Trigger tab within the function.
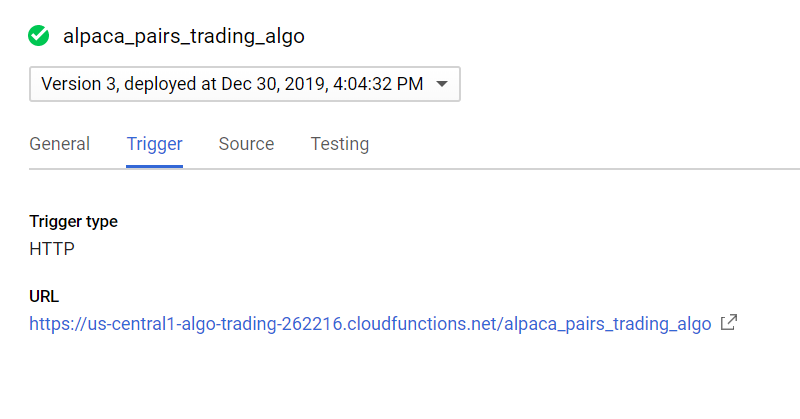
Click the URL and see what happens. If it runs correctly, the window should display, “Mail Sent” and you will receive an email. If this works properly, copy the URL.
Step 7: Create a Google Scheduler Job
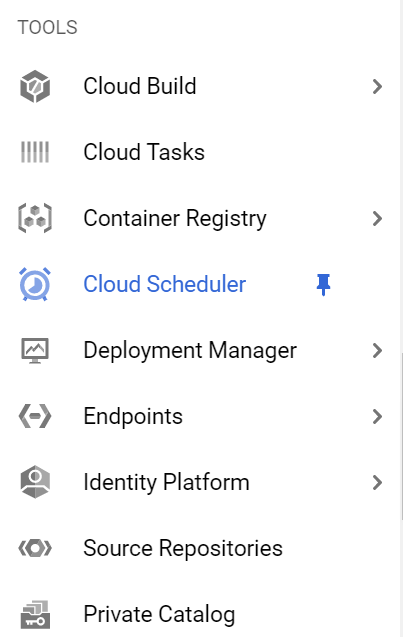
Navigate to the Google Scheduler on the left panel. It is located under “Tools”.
Create a new job.
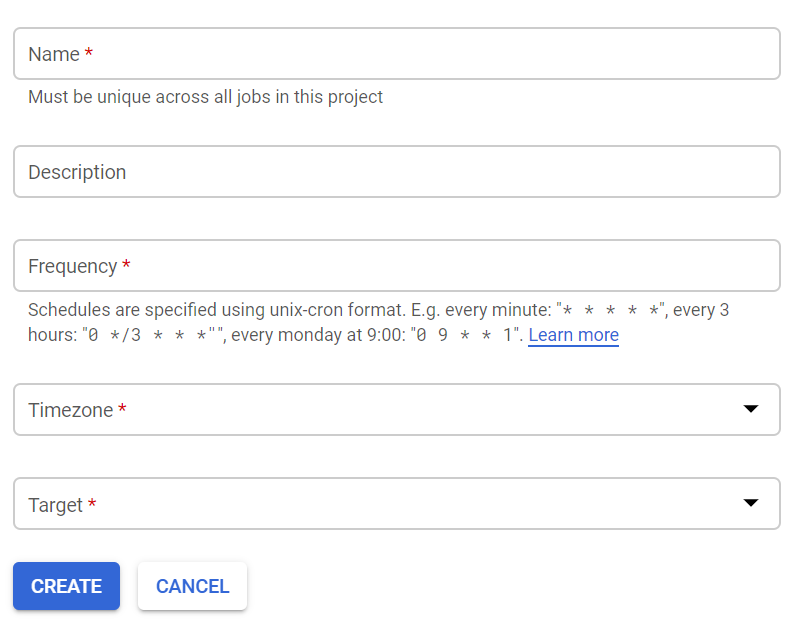
Your screen should look like this:
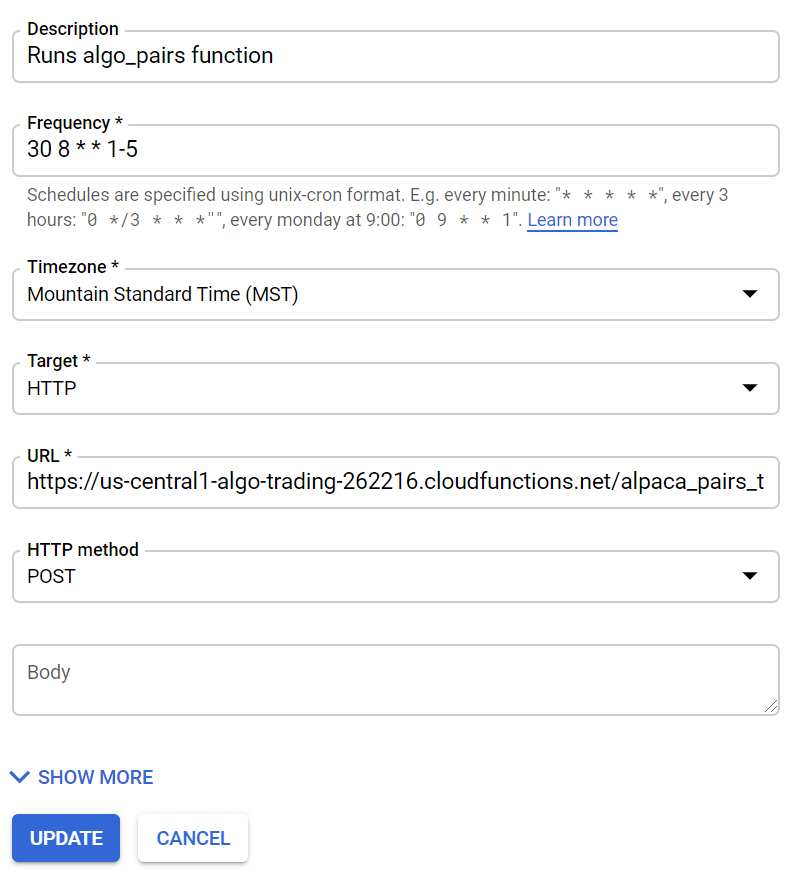
Name it whatever you would like. For frequency, this sample function runs every weekday at 8:30 AM MST (an hour after the market opens).
Paste the URL that you copied from the Cloud Function. After this, you’re set! This will run, as you have specified, on its own. You can test the job by clicking on “Run Now”.

If it runs successfully, you will have a nice email sitting in your inbox similar to the one earlier, and you’ll be making trades (and maybe money**!) in Alpaca.
Conclusion
This step-by-step example displayed how to automate your favorite algo trading strategies—hope you enjoy the email notifications! If you have any suggestions on how to improve this process or the trading strategy itself, send a message or leave a comment.
***All investments involve risk and the past performance of a security, or financial product does not guarantee future results or returns. There is always the potential of losing money when you invest in securities, or other financial products.
Technology and services are offered by AlpacaDB, Inc. Brokerage services are provided by Alpaca Securities LLC (“Alpaca”), member FINRA/SIPC, a wholly-owned subsidiary of AlpacaDB, Inc.
You can find us @AlpacaHQ, if you use twitter.