Commission-free stock trading on a free Google Cloud Platform instance, step-by-step.
When I first started learning about how easy it’s become to take control of my money in the market, day trading jumped out at me as the thing to do. Of course, if it were really as easy as it sounds, everyone would be doing it. Finding a profitable strategy takes time and work, and sticking to it in turbulent market conditions takes discipline.
It’d be a lot easier to take the room for human error — and a whole lot of stress — out of the equation if we could have a computer execute the strategy for us. Just a few years ago, there were a lot of hurdles to doing that, even if you had the programming know-how. Most brokerages that the average person could access charged commission fees, which would eat away the profits of a day-trading strategy. Finding any sort of API access among those that offered commission-free solutions was a challenge to me.
In this article, I am using Alpaca’s commission-free trading API with their premium data service Polygon. (Please note that, according to their docs, you’ll need to sign up for a brokerage account in order to access the premium data feed used here.) I’ll provide a day-trading script that leverages this premium data for a little technical analysis, and I’ll go over what it does and how to run it yourself.
Exploring Our Trading Script
First off, go ahead and get the script from GitHub with this command:
git clone https://github.com/alpacahq/Momentum-Trading-Example.gitNow, you can open it up in your favorite text editor and follow along. Note that near the top of the file, there are placeholders for your API information — your key ID, your secret key, and the URL you want to connect to. You can get all that information from the Alpaca dashboard.
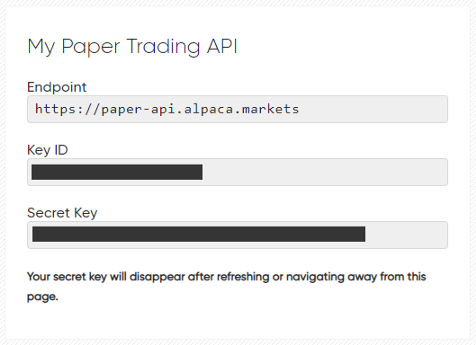
Replace the placeholder strings with your own information, and the script is ready to run. But before we let it touch even your simulated account’s (entirely make-believe) money, let’s go over what it does. (If you’re more interested in how to get it running on GCP than what it’s doing, skip ahead to the next section.)
Broadly, this is a momentum-based algorithm. We’ll not trade for the first fifteen minutes after the market opens, because those are always pretty hectic. Between the fifteenth minute and the first hour, though, we’ll look for stocks that have increased at least 4% from their close on the previous day. If they’ve done that and they meet some other criteria, we’ll buy them, and we’ll hold them until they either rise high enough (meeting our price target) or fall too low (meeting our ‘stop’ level.)
You’ll notice that below the connection information in the code, there are some additional variables that can be configured. These can be tweaked easily to best suit your needs for the algorithm. There are thousands of stocks available to trade, but not all of them are suitable for a strategy like this.
We filter down the list by looking for a few things — we want a relatively low share price, but not one that’s so low that it behaves more like a penny stock. We also want to be sure that the stock is liquid enough that we’ll get our orders filled. We make sure that the dollar volume of the stock was at least min_last_dv on the previous trading day.
The default_stop and risk parameters are important to making sure that our algorithm stays within acceptable limits. Risk is what percent of our portfolio we’ll allocate to any given position. Since we sell when we hit the stop loss, the amount of cash from our portfolio at risk on a trade is default_stop * risk * account_balance .
I won’t go over how we get our initialization data here — if you want, you can take a look at the code and check out Polygon’s documentation on their ‘ticker’ data. What’s a little more interesting is the fact that we can also stream data in real time from Polygon. (This is also done in a recently-published “HFT-ish” example, another Alpaca day trading algorithm that trades much more frequently than this one and tries to profit from tiny order book imbalances.)

Using Alpaca’s Python SDK, we connect to three types of streaming channels. The first is trade_updates, which is simply a connection to Alpaca on which we can hear updates on our orders as they happen. We’ll use this to make sure we’re not submitting multiple open orders at once for a stock and to see whether or not our orders get filled.
Using Alpaca’s Python SDK, we connect to three types of streaming channels. The first is trade_updates, which is simply a connection to Alpaca on which we can hear updates on our orders as they happen. We’ll use this to make sure we’re not submitting multiple open orders at once for a stock and to see whether or not our orders get filled.
The other two channels are A.<symbol> and AM.<symbol> . For each stock that we’re going to watch, we subscribe to those channels to receive updates from Polygon about the price and volume of the stock. The A channel updates every second, whereas the AM channel updates every minute. We aggregate the information from the A channel ourselves so we can do up-to-the-second calculations, but we consider AM to be the source of truth, replacing whatever we’ve aggregated with what comes through that channel. While we might get away with only watching A and relying on our own aggregation, trusting AM gives us a little extra resilience to hiccups in the connection and such.
Once we’ve added the incoming data to our aggregate, if we haven’t already ordered shares of a stock, we check to see if it looks like a good buy. We define a “good buy” as something with a positive, growing MACD that’s been trading at a decent volume and is up over 4% from yesterday’s close so far today. We also want to make sure that it’s maintained its momentum after the open, so we look to see that the price is higher than its highest point during the first fifteen minutes after the market to open. We hope that these stocks will continue to rise in value as the day goes on.
If we have a position in a stock, we also check with each bar that comes in for that stock if it’s time to sell. We sell when the stock has reached either our target price or our stop loss, or if the MACD suggests that the security is losing its momentum and it’s fallen back to our cost basis. Ideally, enough stocks hit the target price we set that we can recover the losses from those that hit the stop loss, with some extra profits on top.
At the end of the trading day, we liquidate any remaining positions we’ve opened at market price. The use of market orders is generally not ideal, but they are used in this case because the potential cost of holding overnight is greater than we were willing to risk on the position. Ideally, we have already liquidated our shares based on our defined stop losses and target prices, but this allows us to catch anything that sneaks by those by trading flat.
If you scroll down past the bottom of the long run() method, you’ll see how we check to see when the market will be opening and closing using the Alpaca Calendar API endpoint. Using this means that, if you like, you can set up a Cron job to run the script at the same time every day without having to worry about market holidays or late opens causing issues. Many people prefer to run their scripts manually, but it’s nice to have the option to just let it run on its own.
GCP Free Instance Setup
At this point, if you’ve plugged in your own API keys, you could just run python algo.py and be off to the races, watching it buy and sell stocks as its signals are triggered through the Alpaca dashboard. But you might not want to leave your own machine running all day — or maybe you’re just worried about a cat bumping the power button during market hours.

Fortunately, it’s easy to get a machine in the cloud — away from your cat — set up with Google Cloud Platform’s free tier. At the time of writing, they’re even offering several hundred dollars in free credit for trial accounts, so you don’t need to worry too much about running into minor incidental costs. Once you’ve signed up for a GCP account, head to the GCP console and create a project.

Once you’ve created a project, go to the sidebar and navigate to Compute Engine > VM Instances. In this panel, you can see any instances you’ve created. That might be blank for now, but let’s go ahead and make one. Hit Create and fill out your configuration like this.
Hit Create at the bottom, and after a short bit of watching a circle spin, you’ll have a machine up and running, visible in the VM Instances panel. It’ll look something like this:

You can click Open in browser window to get a shell to the machine. Go ahead and do that now — we’ll need it in a minute. But before we type anything into the terminal, we need to get our script onto the machine. (You might know of some ways to do that through the terminal — if so, go for it! Or, you can follow along to do it through the GCP console interface.)
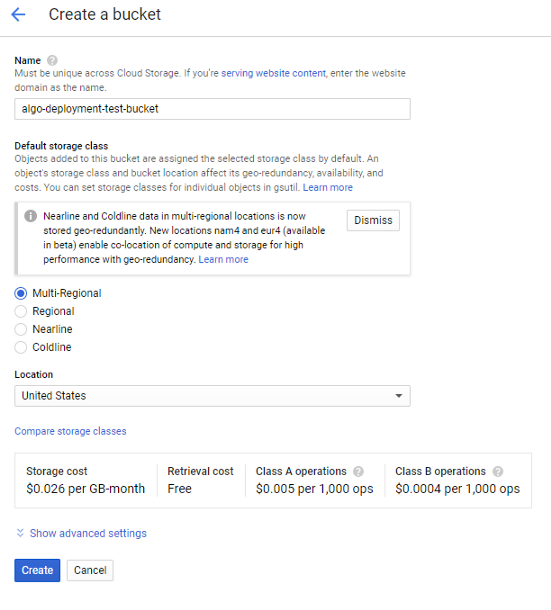
In the sidebar, scroll to Storage > Browser. On the Storage page, go ahead and hit Create Bucket. You’ll get a prompt like this:
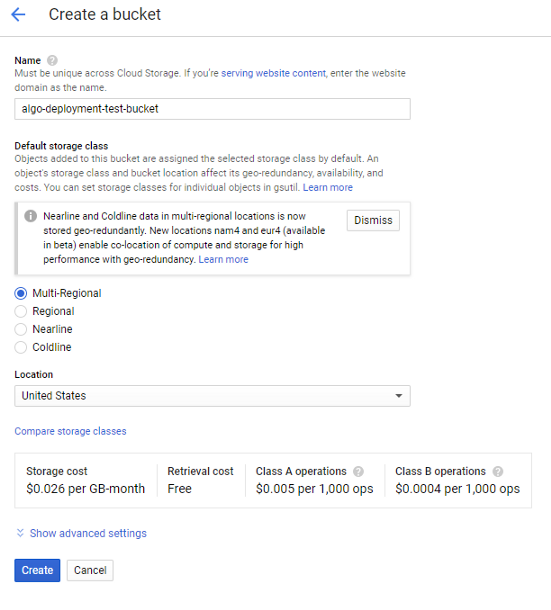
We’re not too concerned about the storage cost, since we’ll be storing much less than 1 GB and only sharing it with our one instance. (And we have a few hundred dollars in credit anyhow, if you’ve signed up for the trial.) Once your bucket is created, it’s easy to put your files into it.
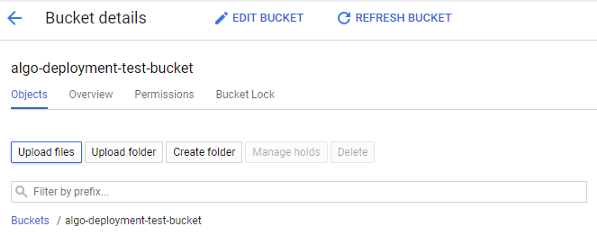
Upload the requirements.txt and algo.py files you checked out from the GitHub repository and plugged your Alpaca API credentials into. We’re almost done! All that’s left is to get the files onto our instance. In the browser terminal you’ve opened, you can type gsutil cp gs://<your-bucket-name>/* . to download your files onto the VM.

Now that the script is on the cloud instance, we just need to run it. Python is already installed, but to make requirement management easy, go ahead and download and install pip. In the VM terminal, do this:
sudo  apt update
sudo apt install python3-pip
And then install the algorithm’s dependencies:
sudo pip3 install -r requirements.txt
And that’s it! Now, when you’re ready to get the algorithm running, you can just type python3 algo.py into the VM’s terminal and watch it get to work. (At this point, you can also delete the bucket you created, if you’re worried about a few pennies in storage fees.) Now that you’re on your way to being a GCP pro; feel free to play around with the Python code in the script and see what works best for you! I hope this guide has been helpful, and good luck!
Technology and services are offered by AlpacaDB, Inc. Brokerage services are provided by Alpaca Securities LLC (alpaca.markets), member FINRA/SIPC. Alpaca Securities LLC is a wholly-owned subsidiary of AlpacaDB, Inc.
You can find us @AlpacaHQ, if you use twitter.
