This blog was last updated on June 4th, 2026.
What if you could build a sophisticated options trading algorithm using nothing but AI prompts? This guide shows you how to set up Alpaca's MCP Server (V2) with Cursor AI, then use that connection to create a bull call spread algorithm that automatically finds option contracts, calculates strikes based on strategy structure, and executes multi-leg trades.
This guide uses Alpaca MCP Server V2, a complete rewrite built with FastMCP and OpenAPI. If you previously set up V1, those steps no longer apply. See the Upgrade Guide for details.
You can also find the video tutorial on YouTube.
To get the most out of this guide, explore the following resources first:
Prerequisites
To use Alpaca's MCP Server on Cursor, make sure you have the following ready:
- An Alpaca Trading API account
- Alpaca Trading API keys (with paper or live trading access)
- Python 3.10+
- uv Python package manager (a fast Python package manager and runner)
- Cursor (MCP client)
If you have already connected Alpaca's MCP Server to Cursor, you can jump ahead to the prompt section below.
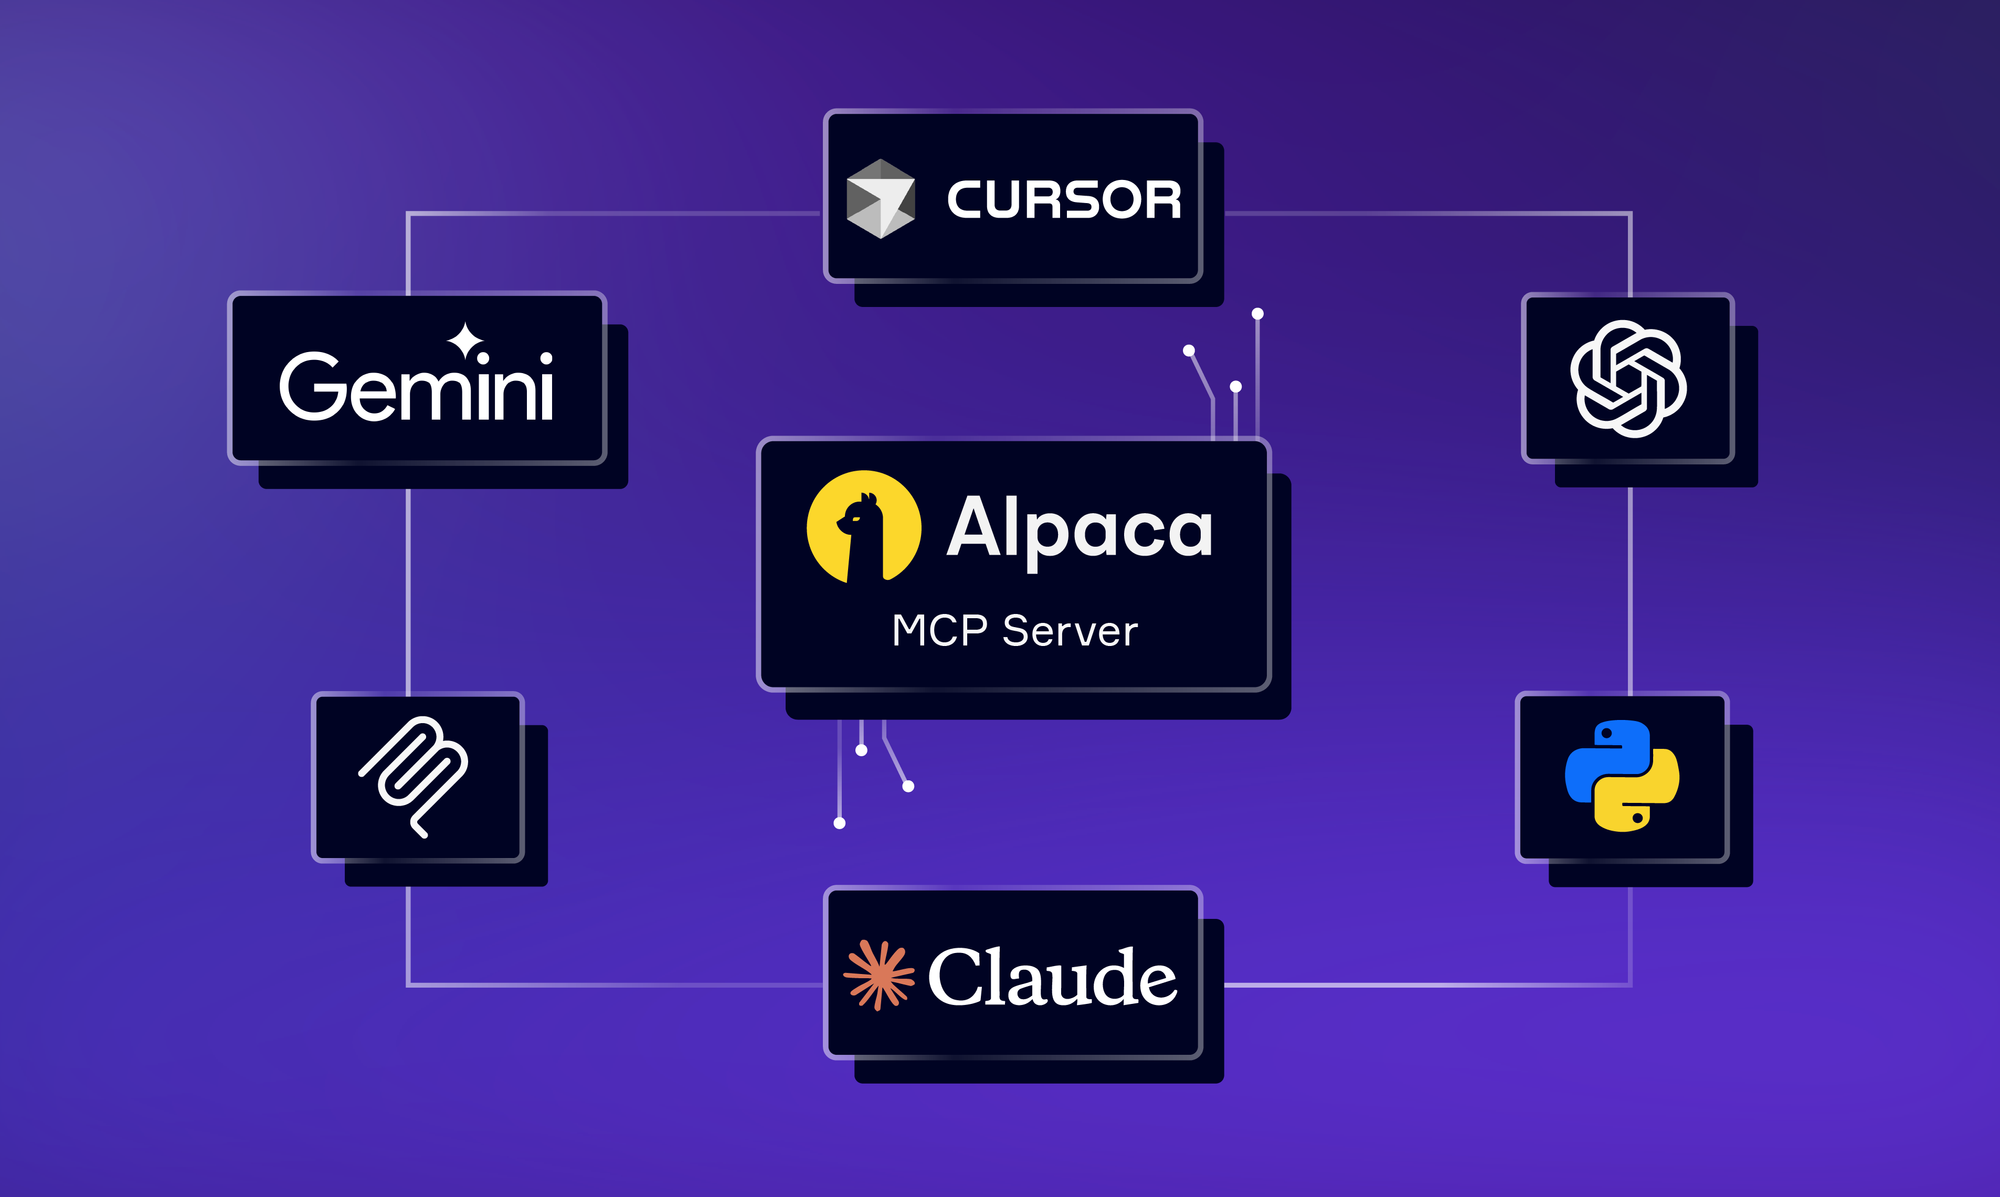
How Alpaca’s MCP Server Helps Algo Traders with AI
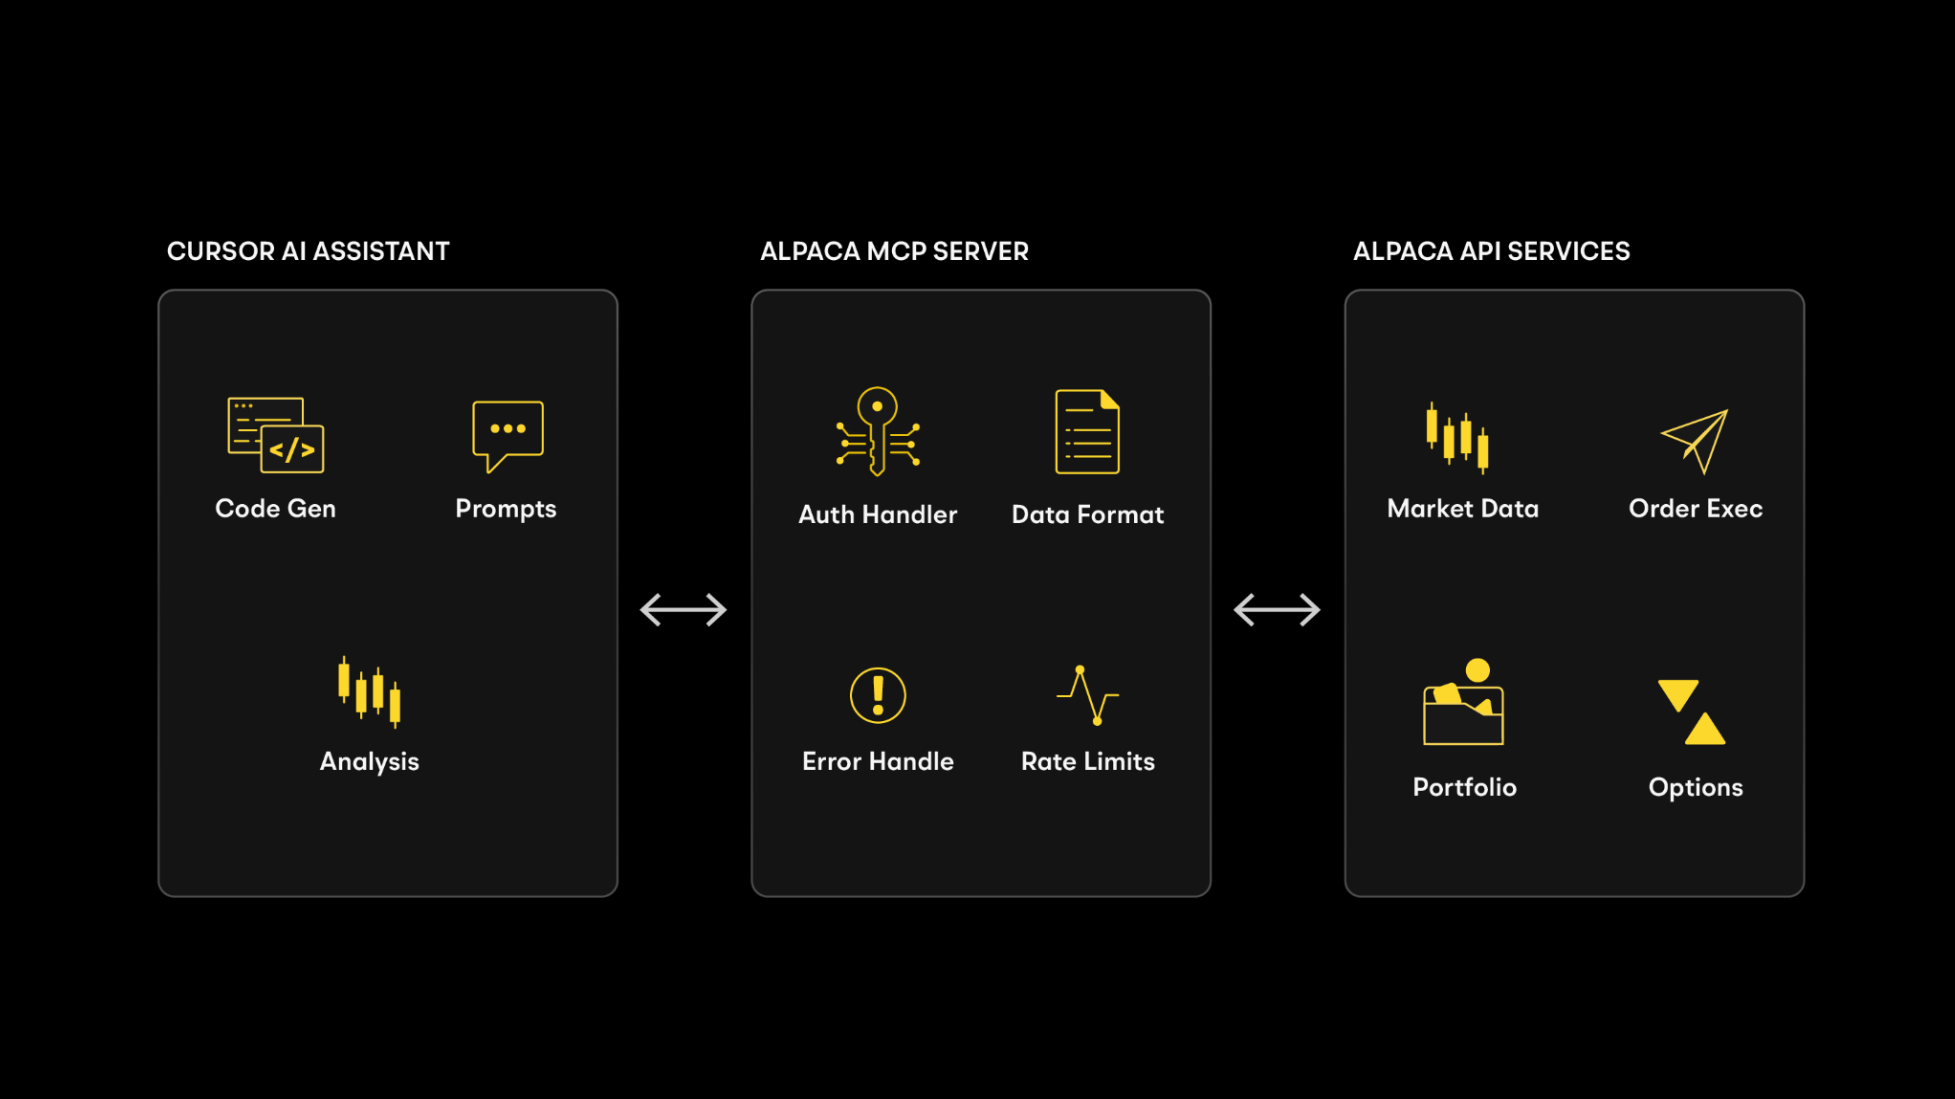
Alpaca's MCP Server acts as a bridge between AI assistants like Cursor, Claude, and VS Code, and Alpaca's Trading API. Instead of reading through API documentation and writing hundreds of lines of code, you can connect the MCP Server to your AI assistant and describe what you want in natural language. The assistant discovers the available trading tools exposed by the server and calls them on your behalf.
The V2 server is built directly from Alpaca's OpenAPI specifications, so it stays aligned with the latest API surface and exposes over 70 tools covering account management, stock/crypto/options trading, market data, watchlists, and more.
Alpaca also offers a command-line interface (CLI) that provides access to 108 trading functions directly from your terminal or AI agent. Alpaca’s CLI complements the MCP Server by giving you a scriptable, terminal-native way to interact with Alpaca's Trading API. You can learn more in the announcement blog post or explore the CLI GitHub repository.
Example Vibe Coding Prompt to Build a Bull Call Spread Trading Algorithm
To generate a functional prototype structuring your prompt correctly is key. Here is a breakdown of the essential components:
Code Generation Preferences
AI tends to produce comprehensive but often redundant codebases by default. You can ask Cursor to generate a simple, functional, and minimal algorithm that prioritizes core functionality over extensive features.
Core Strategy Section
This defines exactly what you want: a bull call spread with customizable parameters. You specify buying calls below the current price and selling calls above the current price.
Essential Variables to Replace
Key input variables are essential for customizing the strategy. You can adjust them to change the underlying asset, price levels for strike selection, or the expiration timeframe.
Command-Line Interface
This is what makes it production-ready. You specify argparse integration like --symbol, --buy-pct, and --dry-run. Argparse is a Python module that lets you pass in values when you run your script so you do not have to change the code every time.
Implementation Details
This lets the AI focus on a clear, functional prototype without over-engineering.
After putting all of the pieces together, you get a prompt that looks something like this:
Create a Python script that implements an automated bull call spread trading algorithm using the alpaca-py SDK. The algorithm should be simple, functional, and minimal, focusing on core functionality over comprehensive features.
Create a Python script that implements an automated bull call spread trading algorithm using Alpaca's MCP server (alpaca_mcp_server.py) by calling the appropriate functions from the MCP server. The algorithm should be SIMPLE, FUNCTIONAL, and MINIMAL - focus on core functionality over comprehensive features.
Core Strategy (Debit Spread):
- Buy call option with strike [BUY_PERCENTAGE]% below current [UNDERLYING_SYMBOL] price (lower strike, long position)
- Sell call option with strike [SELL_PERCENTAGE]% above current [UNDERLYING_SYMBOL] price (higher strike, short position)
- Target expiration: search for available options approximately [WEEKS_AHEAD] weeks from now
- Execute as single multi-leg order for atomic execution
- This creates a debit spread where you pay net premium upfront
Essential Variables to Replace:
- [BUY_PERCENTAGE]: 3 (percentage below current price for long call - lower strike)
- [SELL_PERCENTAGE]: 5 (percentage above current price for short call - higher strike)
- [UNDERLYING_SYMBOL]: "SPY" (stock symbol to trade)
- [WEEKS_AHEAD]: 2 (weeks until expiration)
Critical Requirements:
- Option strike prices must be integers (round calculated percentages to nearest integer)
- Option symbols must use correct format: SYMBOL + YYMMDD + C + 8-digit-strike (strike * 1000 with leading zeros)
- Search for available option contracts first, then use valid expiration dates (don't assume arbitrary dates have options)
- Validate that option contracts exist before attempting to trade
Error Handling:
- Try-catch around load_dotenv() with permission error handling
- Handle API response format: use contracts.option_contracts if attribute exists
- Market hours errors are normal (options only trade during market hours)
- Basic positive number validation
Command-Line Interface:
   - `--symbol, -s`: Underlying symbol to trade (default: [UNDERLYING_SYMBOL])
   - `--buy-pct, --buy-percentage`: Percentage below current price for long call (default: [BUY_PERCENTAGE])
   - `--sell-pct, --sell-percentage`: Percentage above current price for short call (default: [SELL_PERCENTAGE])
   - `--weeks, -w`: Weeks until expiration (default: [WEEKS_AHEAD])
   - `--quantity, -q`: Number of spreads to trade (default: 1)
   - `--dry-run`: Show strategy parameters without executing (default: False)
   - `--help, -h`: Show help with basic examples
Critical: File must be in same directory as .env file or credential loading will fail. Focus on creating a working prototype that demonstrates the core functionality without over-engineering. The code should be straightforward, easy to understand, and functional rather than production-ready.
Focus on creating a working prototype that demonstrates the core functionality without over-engineering. The code should be straightforward, easy to understand, and functional rather than production-ready.
Please note that SPY is used as an example and should not be considered investment advice.
This is just one use case of Alpaca's MCP Server and Cursor. You can create strategies for any type of options trading strategy, or use it for US stocks, ETFs, and crypto.
How to Set Up Alpaca’s MCP Server on Cursor
V2 of Alpaca's MCP Server does not require cloning a repository, creating a virtual environment, or managing a .env file. You install it with a single command through uvx, and credentials are configured directly in your MCP client config.
Option A: Ask Cursor's AI to Install It (Recommended)
Cursor's built-in AI agent can install and configure MCP servers for you. Open Cursor Chat (or Agent mode) and type a prompt like:
“Install Alpaca's MCP Server so I can trade stocks, crypto, and options through Alpaca's Trading API. After the setup is complete, walk me through where to add my Alpaca API key and secret key.”
The agent will locate the alpaca-mcp-server package, add the configuration to your mcp.json, and guide you to the file where you enter your credentials manually. This way your API keys are never exposed in the chat.
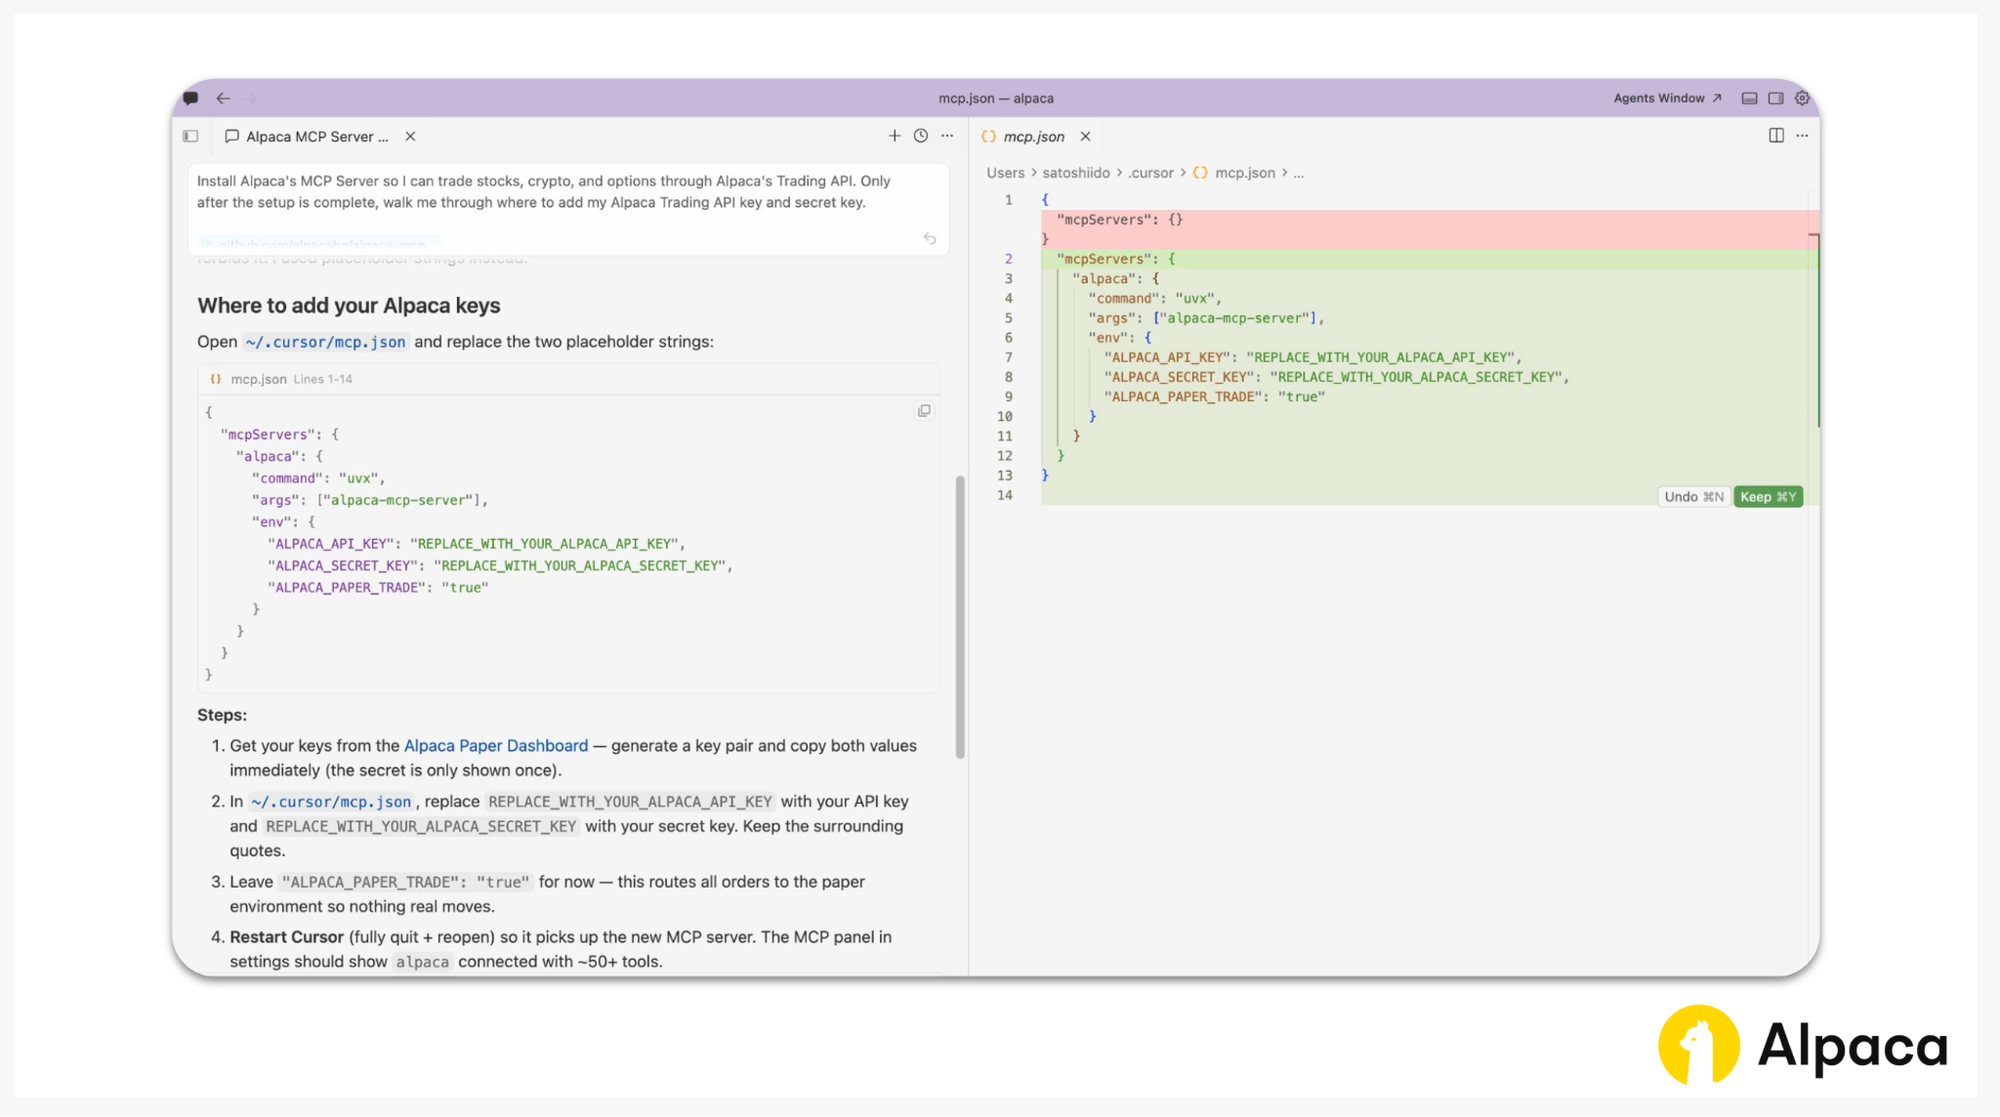
Once Cursor prepared basic setup for you, you do the following steps to set up environment variables:
Replace your_alpaca_api_key and your_alpaca_secret_key in your mcp.json file (~/.cursor/mcp.json) with your actual credentials from the Alpaca Dashboard.
{
  "mcpServers": {
    "alpaca": {
      "command": "uvx",
      "args": ["alpaca-mcp-server"],
      "env": {
        "ALPACA_API_KEY": "your_alpaca_api_key",
        "ALPACA_SECRET_KEY": "your_alpaca_secret_key"
      }
    }
  }
}
Note: To switch the MCP Server to live trading, add "ALPACA_PAPER_TRADE": "false" to the env block and use your live API credentials. Alpaca's paper trading account is a great way to get started: Start Paper Trading.
Optional: Restrict Available Tools with Toolset Filtering
V2 of Alpaca's MCP Server exposes over 61 tools by default. If you want to limit which capabilities your AI assistant can access, use the ALPACA_TOOLSETS environment variable:
{
  "mcpServers": {
    "alpaca": {
      "command": "uvx",
      "args": ["alpaca-mcp-server"],
      "env": {
        "ALPACA_API_KEY": "your_alpaca_api_key",
        "ALPACA_SECRET_KEY": "your_alpaca_secret_key",
        "ALPACA_TOOLSETS": "account,trading,options-data,stock-data"
      }
    }
  }
}
Available toolsets: account, trading, watchlists, assets, stock-data, crypto-data, options-data, corporate-actions, news. See the full toolset reference for descriptions.
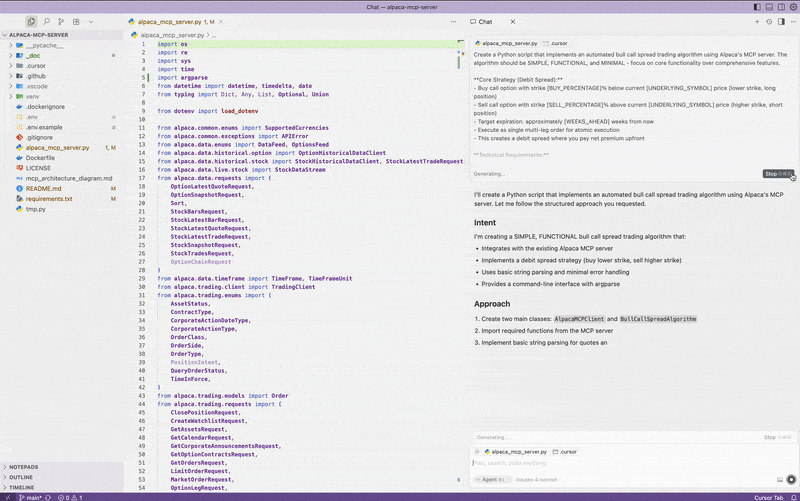
Generate the Algorithm
Open Cursor Chat and paste the prompt from the section above. Cursor will use the MCP Server to look up current market data, find matching option contracts, and help generate a complete Python script you can run from the command line.

Conclusion
With Alpaca's MCP Server and Cursor AI, you can go from idea to working algorithm in a single session. The V2 server installs with one command, requires no repository cloning or .env files, and exposes the full breadth of Alpaca's Trading API to your AI assistant.
Alpaca also offers Alpaca’s command-line interface (CLI) that provides access to 108 trading functions directly from your terminal and AI agent. While the MCP Server runs as a background process within an AI host session, the CLI is a single-invocation command suited for shell scripts, cron jobs, and CI pipelines. Both are generated from Alpaca's OpenAPI specifications. Learn more in the announcement blog post.
If you are new to Alpaca, sign up on the website and start building. Feel free to share your feedback and experiences on the forum, Slack community, or subreddit. For those looking to explore algorithmic trading with Alpaca's Trading API, here are some additional resources:
To get the most out of this guide, explore the following resources first:
- How to Sign up for an Alpaca Trading API Account
- How to Get Alpaca Trading API Key and Start Connecting
- How to Connect Your Alpaca Trading API Account with TradingView
- How to Start Paper Trading with Alpaca's Trading API
- How to Open a Live Alpaca Trading API Account as a US Resident
- How to Open a Live Alpaca Trading API Account as a Non-US Resident
- How to Fund Your Alpaca Live Trading Account
- Alpaca-py GitHub Page
- Alpaca-py Documentation
- Alpaca's Trading API Reference
Related Articles
- How to Build an MCP-Based Trading Workflow with Claude, Alpaca's Trading API, and Google Sheets
- Build and Backtest a Bollinger Bands Strategy with Alpaca's Trading API
- How to Trade Options with Alpaca's Dashboard and Trading API
- How to Get Your Alpaca Trading API Key and Start Your Connection
- How to Start Paper Trading with Alpaca's Trading API
- Alpaca Introduces CLI for Trading API
Frequently Asked Questions
What makes Alpaca’s MCP Server different from using Alpaca's Trading API directly?
Alpaca’s MCP Server lets your AI assistant discover and call Alpaca's Trading API tools automatically. Instead of writing API integration code yourself, you describe what you want in natural language and the assistant handles the requests through the MCP Server. This can be useful for fast prototyping without reading SDK documentation.
What is "Vibe Coding," and how is it different from traditional coding?
Vibe Coding is a way to build trading algorithms by using AI prompts instead of writing everything by hand. You describe the strategy in natural language, and tools like Cursor generate the working code. It is faster, more intuitive, and can be beneficial for people who want to focus on the idea rather than the syntax.
Can I modify this prompt to create other strategies like iron condors, straddles, or vertical puts?
Yes. The prompt is fully customizable. Describe the strategy you want, whether it is an iron condor, straddle, or vertical put, and the AI will adjust the logic accordingly. The setup is flexible enough to handle a wide range of multi-leg strategies.
When should I use Alpaca’s MCP Server vs. Alpaca’s CLI?
Use Alpaca’s MCP Server when you want your AI assistant to handle trading tasks for you through conversation. You describe what you want in plain English, and the assistant figures out which API calls to make. This works inside AI tools like Claude, Codex, Cursor, or VS Code. Use Alpaca’s CLI when you want to run specific trading commands yourself in the terminal. You type explicit commands like alpaca order submit --symbol AAPL --side buy --qty 10 --type market and get immediate results. Alpaca’s CLI also works well for automating tasks with scripts or scheduling recurring jobs. Both tools connect to the same Alpaca’s Trading API.
Can I restrict which trading capabilities my AI assistant can access?
Yes. V2 of the MCP Server supports toolset filtering through the ALPACA_TOOLSETS environment variable. You can limit access to specific categories such as account, trading, options-data, or stock-data so your assistant only sees the tools you choose.
Disclosure
Please note that SPY is used as an example and should not be considered investment advice.
Insights generated by our MCP server and connected AI agents are for educational/ informational purposes only and should not be taken as investment advice. Alpaca does not recommend any specific securities or investment strategies. Past performance from models does not guarantee future results. Please conduct your own due diligence before making any decisions. All firms mentioned operate independently and are not liable for one another.
Please note that this content is for educational and informational purposes only. All screenshots and examples are for illustrative purposes only. Alpaca does not recommend any specific securities or investment strategies.
Options trading is not suitable for all investors due to its inherent high risk, which can potentially result in significant losses. Please read Characteristics and Risks of Standardized Options before investing in options.
Alpaca does not prepare, edit, endorse, or approve Third Party Content. Alpaca does not guarantee the accuracy, timeliness, completeness or usefulness of Third Party Content, and is not responsible or liable for any content, advertising, products, or other materials on or available from third party sites.
All investments involve risk, and the past performance of a security, or financial product does not guarantee future results or returns. There is no guarantee that any investment strategy will achieve its objectives. Please note that diversification does not ensure a profit, or protect against loss. There is always the potential of losing money when you invest in securities, or other financial products. Investors should consider their investment objectives and risks carefully before investing.
The algorithm's calculations are based on historical and real-time market data but may not account for all market factors, including sudden price moves, liquidity constraints, or execution delays. Model assumptions, such as volatility estimates and dividend treatments, can impact performance and accuracy. Trades generated by the algorithm are subject to brokerage execution processes, market liquidity, order priority, and timing delays. These factors may cause deviations from expected trade execution prices or times. Users are responsible for monitoring algorithmic activity and understanding the risks involved. Alpaca is not liable for any losses incurred through the use of this system.
The Paper Trading API is offered by AlpacaDB, Inc. and does not require real money or permit a user to transact in real securities in the market. Providing use of the Paper Trading API is not an offer or solicitation to buy or sell securities, securities derivative or futures products of any kind, or any type of trading or investment advice, recommendation or strategy, given or in any manner endorsed by AlpacaDB, Inc. or any AlpacaDB, Inc. affiliate and the information made available through the Paper Trading API is not an offer or solicitation of any kind in any jurisdiction where AlpacaDB, Inc. or any AlpacaDB, Inc. affiliate (collectively, "Alpaca") is not authorized to do business.
Securities brokerage services are provided by Alpaca Securities LLC (dba "Alpaca Clearing"), member FINRA/SIPC, a wholly-owned subsidiary of AlpacaDB, Inc. Technology and services are offered by AlpacaDB, Inc.
Cryptocurrency services are made available by Alpaca Crypto LLC ("Alpaca Crypto"), a FinCEN registered money services business (NMLS # 2160858), and a wholly-owned subsidiary of AlpacaDB, Inc. Alpaca Crypto is not a member of SIPC or FINRA. Cryptocurrencies are not stocks and your cryptocurrency investments are not protected by either FDIC or SIPC. Please see the Disclosure Library for more information.
This is not an offer, solicitation of an offer, or advice to buy or sell securities or cryptocurrencies or open a brokerage account or cryptocurrency account in any jurisdiction where Alpaca Securities or Alpaca Crypto, respectively, are not registered or licensed, as applicable.